To be able to save snapshots of a folder using Git, you must first put the folder under Git's control by initialising a Git repository in that folder.
Normally, we use Git to manage a revision history of a specific folder, which gives us the ability to revision-control any file in that folder and its subfolders.
To put a folder under the control of Git, we initialise a repository (short name: repo) in that folder. This way, we can initialise repos in different folders, to revision-control different clusters of files independently of each other e.g., files belonging to different projects.
You can follow the hands-on practical below to learn how to initialise a repo in a folder.
What is this? HANDS-ON panels contain hands-on activities you can do as you learn Git. If you are new to Git, we strongly recommend that you do them yourself (even if they appear straightforward), as hands-on usage will help you internalise the concepts and operations better.
Preparation Choose a folder to put under Git's control. The folder may or may not contain any files. For this practical, let us create a folder named things for this purpose.
You can get the Git-Mastery app to for doing this practical, or create the sandbox manually. Instructions for the both options are given below.
To prepare the sandbox for this practical:
- Navigate inside the
gitmastery-exercisesfolder. - Run
gitmastery download hp-init-repocommand.
The sandbox will be set up inside the gitmastery-exercises/hp-init-repo folder.
Assuming you have a folder named git-practicals that you wish to use for doing Git hands-on practicals in, you can run the following commands.
cd git-practicals
mkdir things
Avoid putting Git repos inside cloud-synced (e.g., OneDrive, Dropbox) folders. Reason: Multiple tools trying to detect/sync changes in the same folder can cause conflicts and unexpected behaviors.
If you want to access project files from multiple computers, use Git to do that (rather than cloud syncing tools).
1 Then cd into it.
cd things
2 Run the git status command to check the status of the folder.
git status
fatal: not a git repository (or any of the parent directories): .git
Don't panic. The error message is expected. It confirms that the folder currently does not have a Git repo.
3 Now, initialise a repository in that folder.
Use the command git init which should initialise the repo.
git init
Initialized empty Git repository in things/.git/
The output might also contain a hint about a name for an initial branch (e.g., hint: Using 'master' as the name for the initial branch ...). You can ignore that for now.
Note how the output mentions the repo being created in things/.git/ (not things/). More on that later.
Windows: Click
File→Clone/New…→ Click on+ Createbutton on the top menu bar.
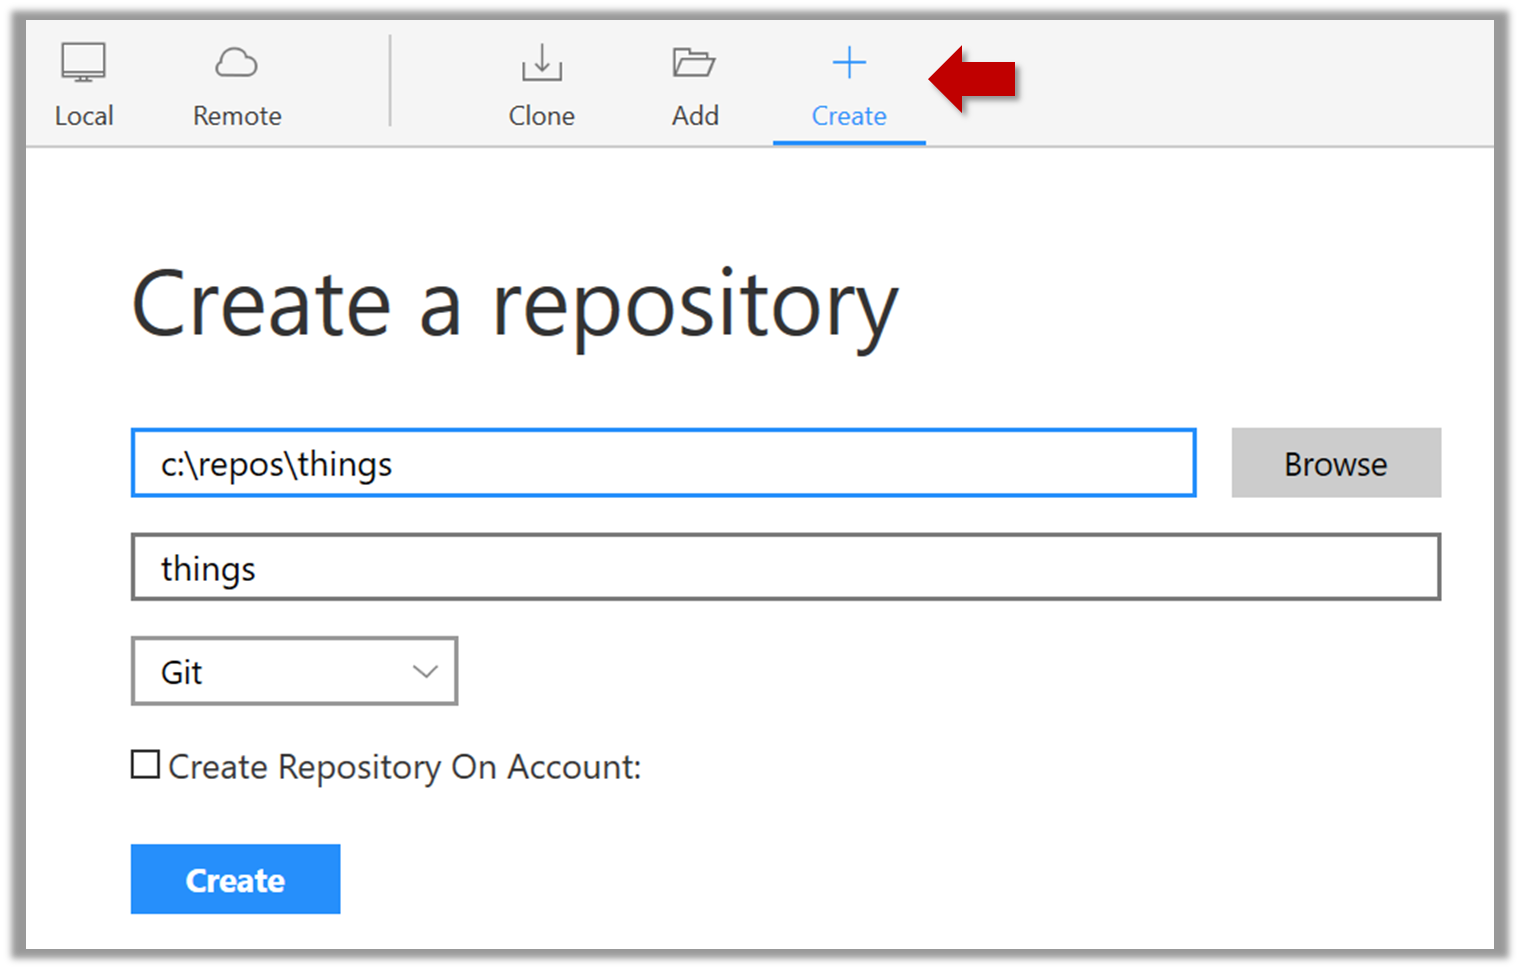
Enter the location of the directory and clickCreate.Mac:
New...→Create Local Repository(orCreate New Repository) → Click...button to select the folder location for the repository → click theCreatebutton.
done!
Initialising a repo results in two things:
- First, Git now recognises this folder as a Git repository, which means it can now help you track the version history of files inside this folder.
To confirm, you can run the git status command. It should respond with something like the following:
git status
On branch master
No commits yet
nothing to commit (create/copy files and use "git add" to track)
Don't worry if you don't understand the output (we will learn about them later); what matters is that it no longer gives an error message as it did before.
done!
- Second, Git created a hidden subfolder named
.gitinside thethingsfolder. This folder will be used by Git to store metadata about this repository.
A Git-controlled folder is divided into two main parts:
- The repository – stored in the hidden
.gitsubfolder, which contains all the metadata and history. - The working directory – everything else in that folder, where you create and edit files.
What is this? EXERCISE panels contain a Git-Mastery exercise that you can download using the Git-Mastery app, and you can use the same app to verify that your solution is correct.
What is this? DETOUR panels contain related directions you can optionally explore. We recommend that you only skim them the first time you are going through a tour (i.e., just to know what each detour covers); you can revisit them later, to deepen your knowledge further, or when you encounter a use case related to the concepts covered by the detour.