Most work done in branches eventually gets merged together.
Merging combines the changes from one branch into another, bringing their diverged timelines back together.
When you merge, Git looks at the two branches and figures out how their histories have diverged since their merge base (i.e., the most recent common ancestor commit of two branches). It then applies the changes from the other branch onto your current branch, creating a new commit. The new commit created when merging is called a merge commit — it records the result of combining both sets of changes.
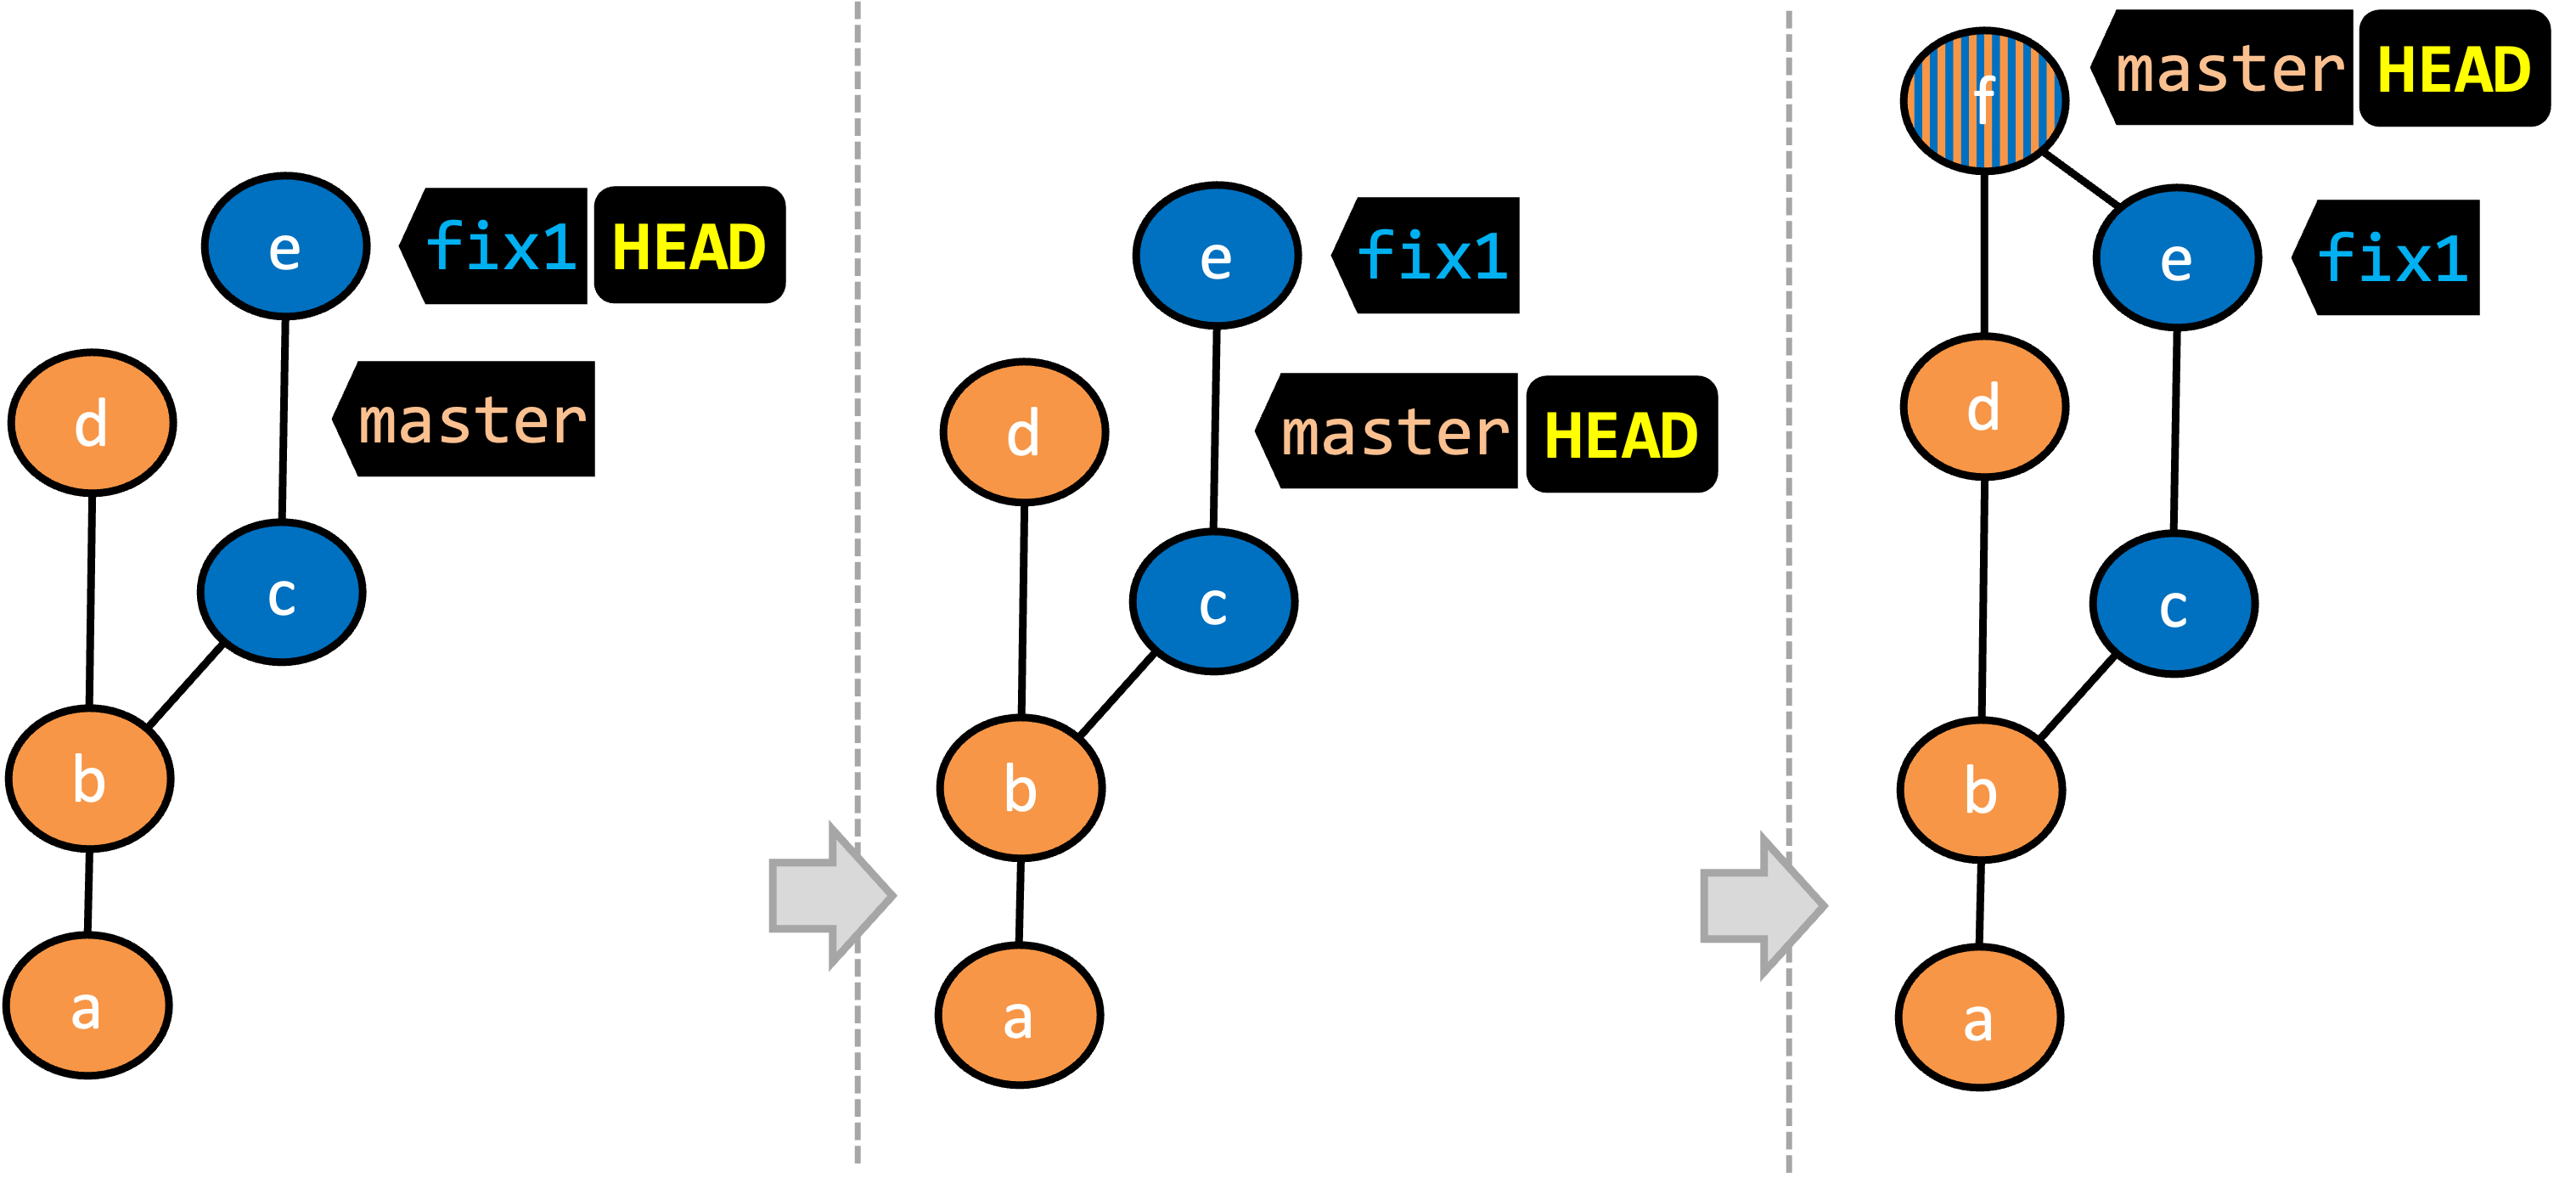
Given below is an illustration of how such a merge looks like in the revision graph:

- We are on the
fix1branch (as indicated byHEAD). - We have switched to the
masterbranch (thus,HEADis now pointing tomasterref). - The
fix1branch has been merged into themasterbranch, creating a merge commitf. The repo is still on themasterbranch.
The branch you are merging into called the destination branch (other terms: receiving branch, target branch)
The branch you are merging is referred to as the source branch (other terms: incoming branch, merge branch).
In the above example, master is the destination branch and fix1 is the source branch.
A merge commit has two parent commits e.g., in the above example, the merge commit f has both d and e as parent commits. The parent commit on the destination branch is considered the first parent and the parent commit on the source branch is considered the second parent e.g., in the example above, fix1 branch is the source branch that is being merged into the destination branch master -- accordingly, d is the first parent and e is the second parent.
Preparation We continue with the samplerepo-things repo from earlier, which should look like the following. Note that we are ignoring the feature1-alt branch, for simplicity.
gitGraph BT:
    %%{init: { 'theme': 'default', 'gitGraph': {'mainBranchName': 'master'}} }%%
    commit id: "m1"
    commit id: "m2"
    branch feature1
    commit id: "f1"
    commit id: "[feature1] f2"
    checkout master
    commit id: "[HEAD → master] m3"
    checkout feature1
1 Switch back to the feature1 branch.
gitGraph BT:
    %%{init: { 'theme': 'default', 'gitGraph': {'mainBranchName': 'master'}} }%%
    commit id: "m1"
    commit id: "m2"
    branch feature1
    commit id: "f1"
    commit id: "[HEAD → feature1] f2"
    checkout master
    commit id: "[master] m3"
    checkout feature1
2 Merge the master branch to the feature1 branch, giving an end-result like the following. Also note how Git has created a merge commit (shown as mc1 in the diagram below).
gitGraph BT:
    %%{init: { 'theme': 'default', 'gitGraph': {'mainBranchName': 'master'}} }%%
    commit id: "m1"
    commit id: "m2"
    branch feature1
    commit id: "f1"
    commit id: "f2"
    checkout master
    commit id: "[master] m3"
    checkout feature1
    merge master id: "[HEAD → feature1] mc1"
$ git merge master
Right-click on the master branch and choose merge master into the current branch. Click OK in the next dialog.
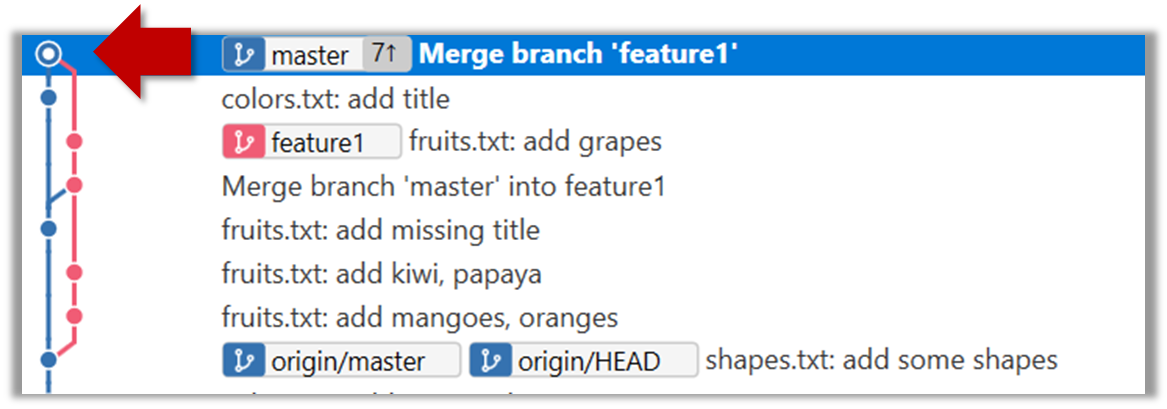
The revision graph should look like this now (colours and line alignment might vary but the graph structure should be the same):

Observe how the changes you made in the master branch (i.e., the imaginary bug fix in m3) is now available even when you are in the feature1 branch.
Furthermore, observe (e.g., git show HEAD) how the merge commit contains the sum of changes done in commits m3, f1, and f2.
3 Add another commit to the feature1 branch, in which you do some further changes to the numbers.txt.
Switch to the master branch and add one more commit.
gitGraph BT:
    %%{init: { 'theme': 'default', 'gitGraph': {'mainBranchName': 'master'}} }%%
    commit id: "m1"
    commit id: "m2"
    branch feature1
    commit id: "f1"
    commit id: "f2"
    checkout master
    commit id: "m3"
    checkout feature1
    merge master id: "mc1"
    commit id: "[feature1] f3"
    checkout master
    commit id: "[HEAD → master] m4"
4 Merge feature1 to the master branch, giving an end-result like this:
gitGraph BT:
    %%{init: { 'theme': 'default', 'gitGraph': {'mainBranchName': 'master'}} }%%
    commit id: "m1"
    commit id: "m2"
    branch feature1
    commit id: "f1"
    commit id: "f2"
    checkout master
    commit id: "m3"
    checkout feature1
    merge master id: "mc1"
    commit id: "[feature1] f3"
    checkout master
    commit id: "m4"
    merge feature1 id: "[HEAD → master] mc2"
git merge feature1
Right-click on the feature1 branch and choose Merge.... The resulting revision graph should look like this:

Now, any changes you made in feature1 branch are available in the master branch.
done!
When the destination branch hasn't diverged — meaning it hasn't had any new commits since the merge base — Git simply moves the branch pointer forward to include all the new commits in the source branch, keeping the history clean and linear. This is called a fast-forward merge because Git simply "fast-forwards" the branch pointer to the tip of the other branch. The result looks as if all the changes had been made directly on one branch, without any branching at all.
gitGraph BT:
    %%{init: { 'theme': 'default', 'gitGraph': {'mainBranchName': 'master'}} }%%
    commit id: "m1"
    commit id: "[HEAD → master] m2"
    branch bug-fix
    commit id: "b1"
    commit id: "[bug-fix] b2"
    checkout master
→
[merge bug-fix]
gitGraph BT:
    %%{init: { 'theme': 'default', 'gitGraph': {'mainBranchName': 'master'}} }%%
    commit id: "m1"
    commit id: "m2"
    commit id: "b1"
    commit id: "[HEAD → master][bug-fix] b2"
    checkout master
In the example above, the master branch has not changed since the merge base (i.e., m2). Hence, merging the branch bug-fix onto master can be done by fast-forwarding the master branch ref to the tip of the bug-fix branch (i.e., b2).
Preparation Let's continue with the same samplerepo-things repo we used above, and do a fast-forward merge this time.
1 Create a new branch called add-countries, and some commits to it as follows:
Switch to the new branch, add a file named countries.txt, stage it, and commit it.
Do some changes to countries.txt, and commit those changes.
You should have something like this now:
gitGraph BT:
    %%{init: { 'theme': 'default', 'gitGraph': {'mainBranchName': 'master'}} }%%
    commit id: "[master] mc2"
    branch add-countries
    commit id: "a1"
    commit id: "[HEAD → add-countries] a2"
2 Go back to the master branch.
gitGraph BT:
    %%{init: { 'theme': 'default', 'gitGraph': {'mainBranchName': 'master'}} }%%
    commit id: "[HEAD → master] mc2"
    branch add-countries
    commit id: "a1"
    commit id: "add-countries] a2"
3 Merge the add-countries branch onto the master branch. Observe that there is no merge commit. The master branch ref (and the HEAD ref along with it) moved to the tip of the add-countries branch (i.e., a2) and both branches now point to a2.
gitGraph BT:
    %%{init: { 'theme': 'default', 'gitGraph': {'mainBranchName': 'master (and add-countries)'}} }%%
    commit id: "mc2"
    commit id: "a1"
    commit id: "[HEAD → master][add-countries] a2"
done!
It is possible to force Git to create a merge commit even if fast forwarding is possible. This is useful if you prefer the revision graph to visually show when each branch was merged to the main timeline.
To prevent Git from fast-forwarding, use the --no-ff switch when merging. Example:
git merge --no-ff add-countries
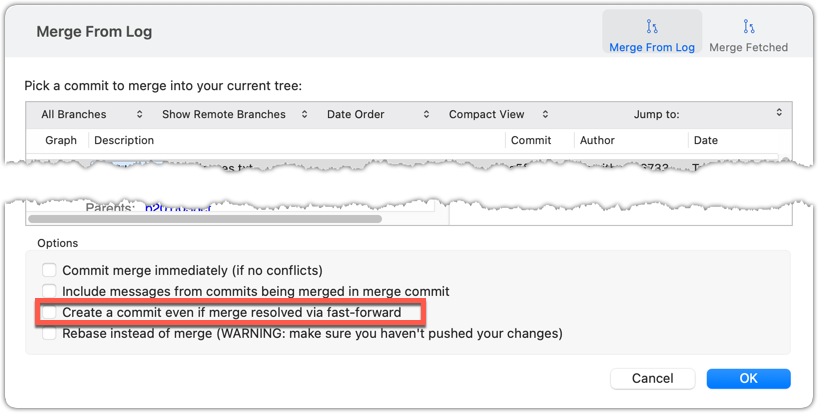
Windows: Tick the box shown below when you merge a branch:

Mac:
Trigger the branch operation using the following menu button:

In the next dialog, tick the following option:

To permanently prevent fast-forwarding:
- Go to Sourcetree
Settings. - Navigate to the
Gitsection. - Tick the box
Do not fast-forward when merging, always create commit.
A squash merge takes all the changes from the source branch and combines them into a single commit on the destination branch. It is especially useful when the source branch has many small or experimental commits that would otherwise clutter history.
gitGraph BT:
    %%{init: { 'theme': 'default', 'gitGraph': {'mainBranchName': 'master'}} }%%
    commit id: "[HEAD → master] m1"
    branch feature
    checkout feature
    commit id: "f1"
    commit id: "[feature] f2"
→
[squash merge...]
gitGraph BT:
    %%{init: { 'theme': 'default', 'gitGraph': {'mainBranchName': 'master'}} }%%
    commit id: "m1"
    branch feature
    checkout feature
    commit id: "f1"
    commit id: "[feature] f2"
    checkout master
    commit id: "[HEAD → master] s1 (same as f1+f2)"
In the example above, the branch feature has been squash merged onto the master branch, creating a single 'squashed' commit s1 that combines all the commits in feature branch.
After a squash merge, you typically delete the source branch, so its individual commits are no longer kept. The destination branch's history stays linear, as the work done in the source branch is replaced by one commit on the destination branch. As a result, a squash merge commit is just a normal commit, and does not have a 'parent' reference to the source branch.
gitGraph BT:
    %%{init: { 'theme': 'default', 'gitGraph': {'mainBranchName': 'master'}} }%%
    commit id: "[HEAD → master] m1"
    branch feature
    checkout feature
    commit id: "f1"
    commit id: "[feature] f2"
    checkout master
    merge feature
with a merge commit]
gitGraph BT:
    %%{init: { 'theme': 'default', 'gitGraph': {'mainBranchName': 'master'}} }%%
    commit id: "m1"
    commit id: "f1"
    commit id: "[HEAD → master][feature] f2"
gitGraph BT:
    %%{init: { 'theme': 'default', 'gitGraph': {'mainBranchName': 'master'}} }%%
    commit id: "m1"
    commit id: "[HEAD → master] s1 (same as f1+f2)"
deleting the source branch thereafter]
The mechanics of doing a squash merge is covered in a separate detour.