The second step of backing up a local repo on GitHub: link the local repo with the remote repo on GitHub.
A Git remote is a reference to a repository hosted elsewhere, usually on a server like GitHub, GitLab, or Bitbucket. It allows your local Git repo to communicate with another remote copy — for example, to upload locally-created commits that are missing in the remote copy.
By adding a remote, you are informing the local repo details of a remote repo it can communicate with, for example, where the repo exists and what name to use to refer to the remote.
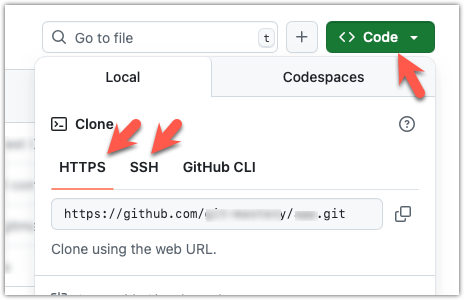
The URL you use to connect to a remote repo depends on the protocol — HTTPS or SSH:
- HTTPS URLs use the standard web protocol and start with
https://github.com/(for GitHub users). e.g.,https://github.com/username/repo-name.git - SSH URLs use the secure shell protocol and start with
git@github.com:. e.g.,git@github.com:username/repo-name.git
A Git repo can have multiple remotes. You simply need to specify different names for each remote (e.g., upstream, central, production, other-backup ...).
Add the empty remote repo you created on GitHub as a remote of a local repo you have.
1 In a terminal, navigate to the folder containing the local repo things you created earlier.
2 List the current list of remotes using the git remote -v command, for a sanity check. No output is expected if there are no remotes yet.
3 Add a new remote repo using the git remote add <remote-name> <remote-url> command.
Format of the <remote-url>:
https://github.com/<owner>/<repo>.git # using HTTPS
git@github.com:<owner>/<repo>.git # using SSH
The full command:
git remote add origin https://github.com/JohnDoe/things.git # using HTTPS
git remote add origin git@github.com:JohnDoe/things.git # using SSH
4 List the remotes again to verify the new remote was added.
git remote -v
origin https://github.com/johndoe/things.git (fetch)
origin https://github.com/johndoe/things.git (push)
The same remote will be listed twice, to show that you can do two operations (fetch and push) using this remote. You can ignore that for now. The important thing is the remote you added is being listed.
1 Open the local repo in Sourcetree.
2 Open the dialog for adding a remote, as follows:
Choose Repository → Repository Settings menu option.
Choose Repository → Repository Settings... → Choose Remotes tab.
3 Add a new remote to the repo with the following values.
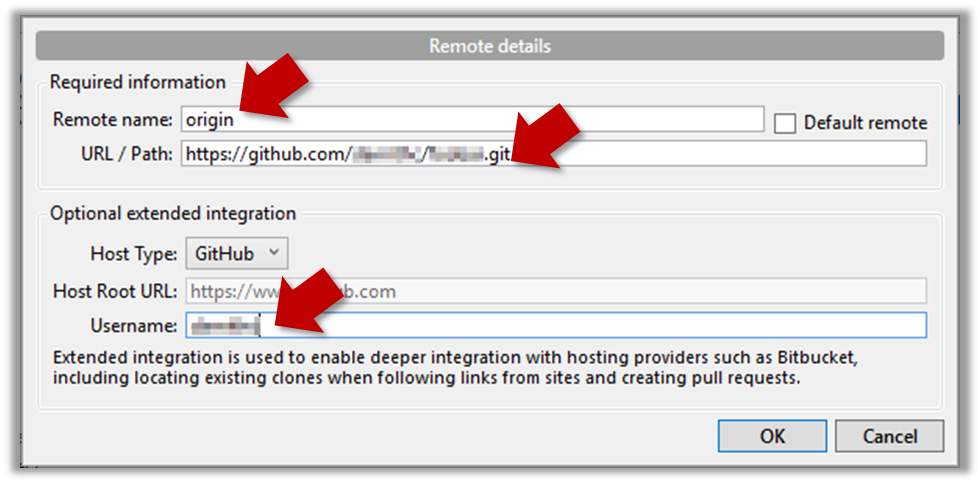
Remote name: the name you want to assign to the remote repo i.e.,originURL/path: the URL of your remote repohttps://github.com/<owner>/<repo>.git # using HTTPS git@github.com:<owner>/<repo>.git # using SSHe.g.,
https://github.com/JohnDoe/things.git # using HTTPS git@github.com:JohnDoe/things.git # using SSHUsername: your GitHub username
4 Verify the remote was added by going to Repository → Repository Settings again.
5 Add another remote, to verify that a repo can have multiple remotes. You can use any name (e.g., backup and any URL for this).
done!
To find the URL of a repo on GitHub, you can click on the Code button: