To save a snapshot, you start by specifying what to include in it, also called staging.
Git considers new files that you add to the working directory as 'untracked' i.e., Git is aware of them, but they are not yet under Git's control. The same applies to files that existed in the working folder at the time you initialised the repo.
A Git repo has an internal space called the staging area which it uses to build the next snapshot. Another name for the staging area is the index.
We can stage an untracked file to tell Git that we want its current version to be included in the next snapshot (in Git terminology, such a snapshot is called a commit). Once you stage an untracked file, it becomes 'tracked' (i.e., under Git's control). A staged file can be unstaged to indicate that we no longer want it to be included in the next snapshot.
In the example below, you can see how staging files change the status of the repo as you go from (a) to (c).
staging area
[empty]
other metadata ...
├─ fruits.txt (untracked!)
└─ colours.txt (untracked!)
(a) State of the repo, just after initialisation, and creating two files. Both are untracked.
staging area
└─ fruits.txt
other metadata ...
├─ fruits.txt (tracked)
└─ colours.txt (untracked!)
(b) State after staging
fruits.txt.staging area
├─ fruits.txt
└─ colours.txt
other metadata ...
├─ fruits.txt (tracked)
└─ colours.txt (tracked)
(c) State after staging
colours.txt.preparation
You can continue using the sandbox created in the previous hands-on practical, or,
1 Add a file (e.g., fruits.txt) to the things repo folder.
Here is an easy way to do that with a single terminal command.
echo -e "apples\nbananas\ncherries" > fruits.txt
apples
bananas
cherries
Windows users: Use the git-bash terminal to run the above command (and all commands given in these lessons). Some of them might not work in other terminals such as the PowerShell.
To see the content of the file, you can use the cat command:
cat fruits.txt
2 Stage the new file.
2.1 Check the status of the folder using the git status command.
git status
On branch master
No commits yet
Untracked files:
(use "git add <file>..." to include in what will be committed)
fruits.txt
nothing added to commit but untracked files present (use "git add" to track)
2.2 Use the git add <file> command to stage the file.
git add fruits.txt
You can replace the add with stage (e.g., git stage fruits.txt) and the result is the same (they are synonyms).
Windows users: When using the echo command to write to text files from Git Bash, you might see a warning LF will be replaced by CRLF the next time Git touches it when Git interacts with such a file. This warning is caused by the way line endings are handled differently by Git and Windows. You can simply ignore it, or suppress it in future by running the following command:
git config --global core.safecrlf false
2.3 Check the status again. You can see the file is no longer 'untracked'.
git status
On branch master
No commits yet
Changes to be committed:
(use "git rm --cached <file>..." to unstage)
new file: fruits.txt
As before, don't worry if you don't understand the content of the output (we'll unpack it in a later lesson). The point to note is that the file is no longer listed as 'untracked'.
2.1 Note how the file is shown as ‘unstaged’. The question mark icon indicates the file is untracked.
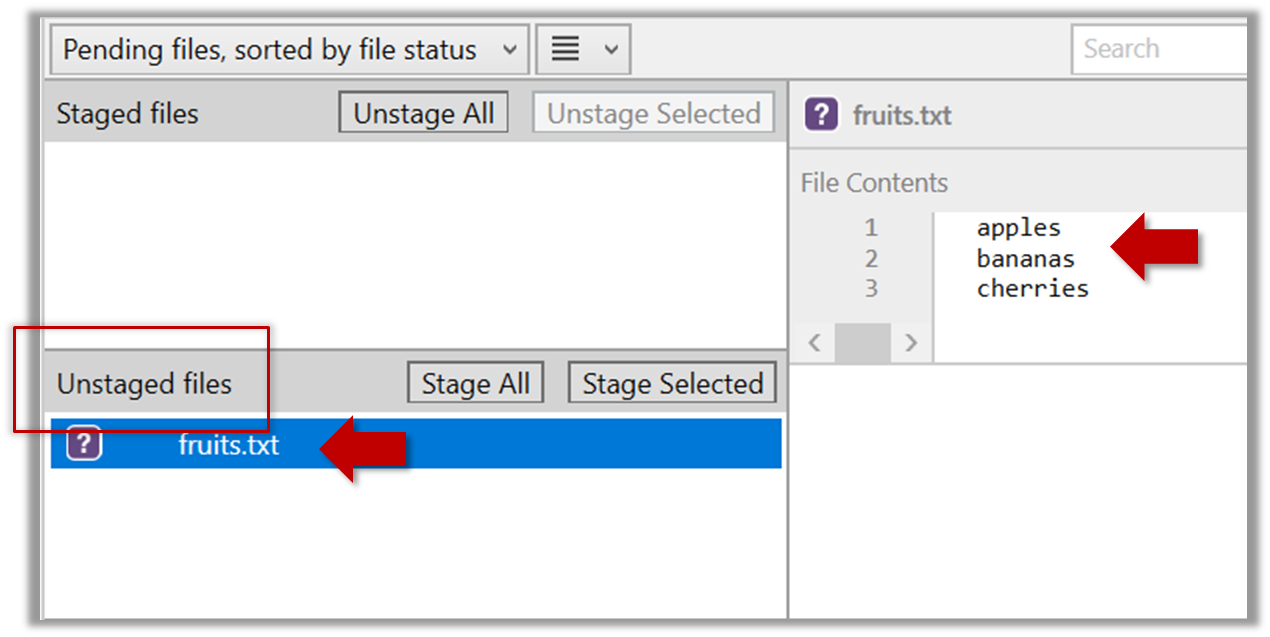
If the newly-added file does not show up in Sourcetree UI, refresh the UI (: F5
| ⌥+R)
Sourcetree screenshots/instructions: vs
Note that Sourcetree UI can vary slightly between Windows and Mac versions. Some of the screenshots given in our lessons are from the Windows version while some are from the Mac version.
In som cases, we have specified how they differ.
In other cases, you may need to adapt if the given screenshots/instructions are slightly different from what you are seeing in your Sourcetree.
2.2 Stage the file:
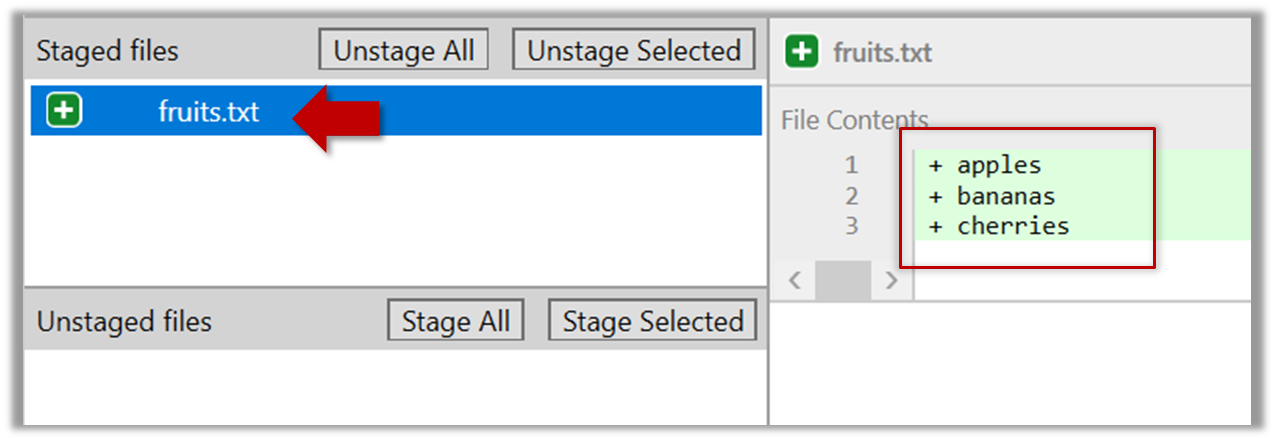
Select the fruits.txt and click on the Stage Selected button.
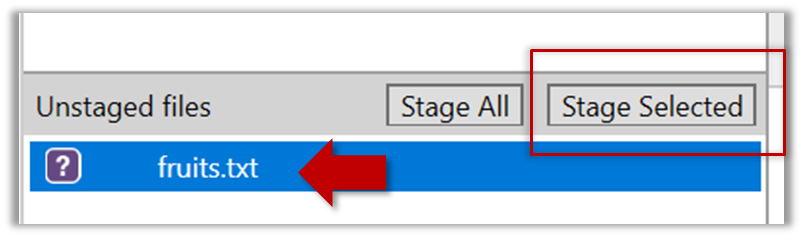
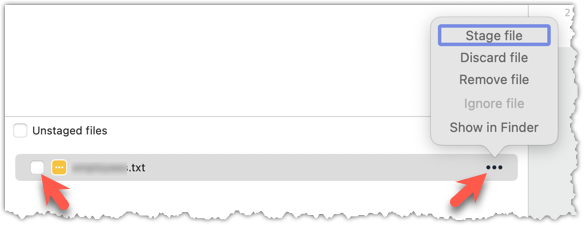
Staging can be done using tick boxes or the ... menu in front of the file.
2.3 Note how the file is staged now i.e., fruits.txt appears in the Staged files panel now.
If Sourcetree shows a \ No newline at the end of the file message below the staged lines (i.e., below the cherries line in the above screenshot), that is because you did not hit enter after entering the last line of the file (hence, Git is not sure if that line is complete). To rectify, move the cursor to the end of the last line in that file and hit enter (like you are adding a blank line below it). This new change will now appear as an 'unstaged' change. Stage it as well.
done!
If you modify a staged file, it goes into the 'modified' state i.e., the file contains modifications that are not present in the copy that is waiting (in the staging area) to be included in the next snapshot. If you wish to include these new changes in the next snapshot, you need to stage the file again, which will overwrite the copy of the file that was previously in the staging area.
The example below shows how the status of a file changes when it is modified after it was staged.
staging area
Alice
other metadata ...
Alice
(a) The file names.txt is staged. The copy in the staging area is an exact match to the one in the working directory.
staging area
Alice
other metadata ...
Alice
Bob
(b) State after adding a line to the file. Git indicates it as 'modified' because it now differs from the version in the staged area.
staging area
Alice
Bob
other metadata ...
Alice
Bob
(c) After staging the file again, the staging area is updated with the latest copy of the file, and it is no longer marked as 'modified'.
preparation
You can continue using the sandbox created in the previous hands-on practical, or,
1 First, add another line to fruits.txt, to make it 'modified'.
Here is a way to do that with a single terminal command.
echo "dragon fruits" >> fruits.txt
apples
bananas
cherries
dragon fruits
2 Now, verify that Git sees that file as 'modified'.
Use the git status command to check the status of the working directory.
$ git status
On branch master
No commits yet
Changes to be committed:
(use "git rm --cached <file>..." to unstage)
new file: fruits.txt
Changes not staged for commit:
(use "git add <file>..." to update what will be committed)
(use "git restore <file>..." to discard changes in working directory)
modified: fruits.txt
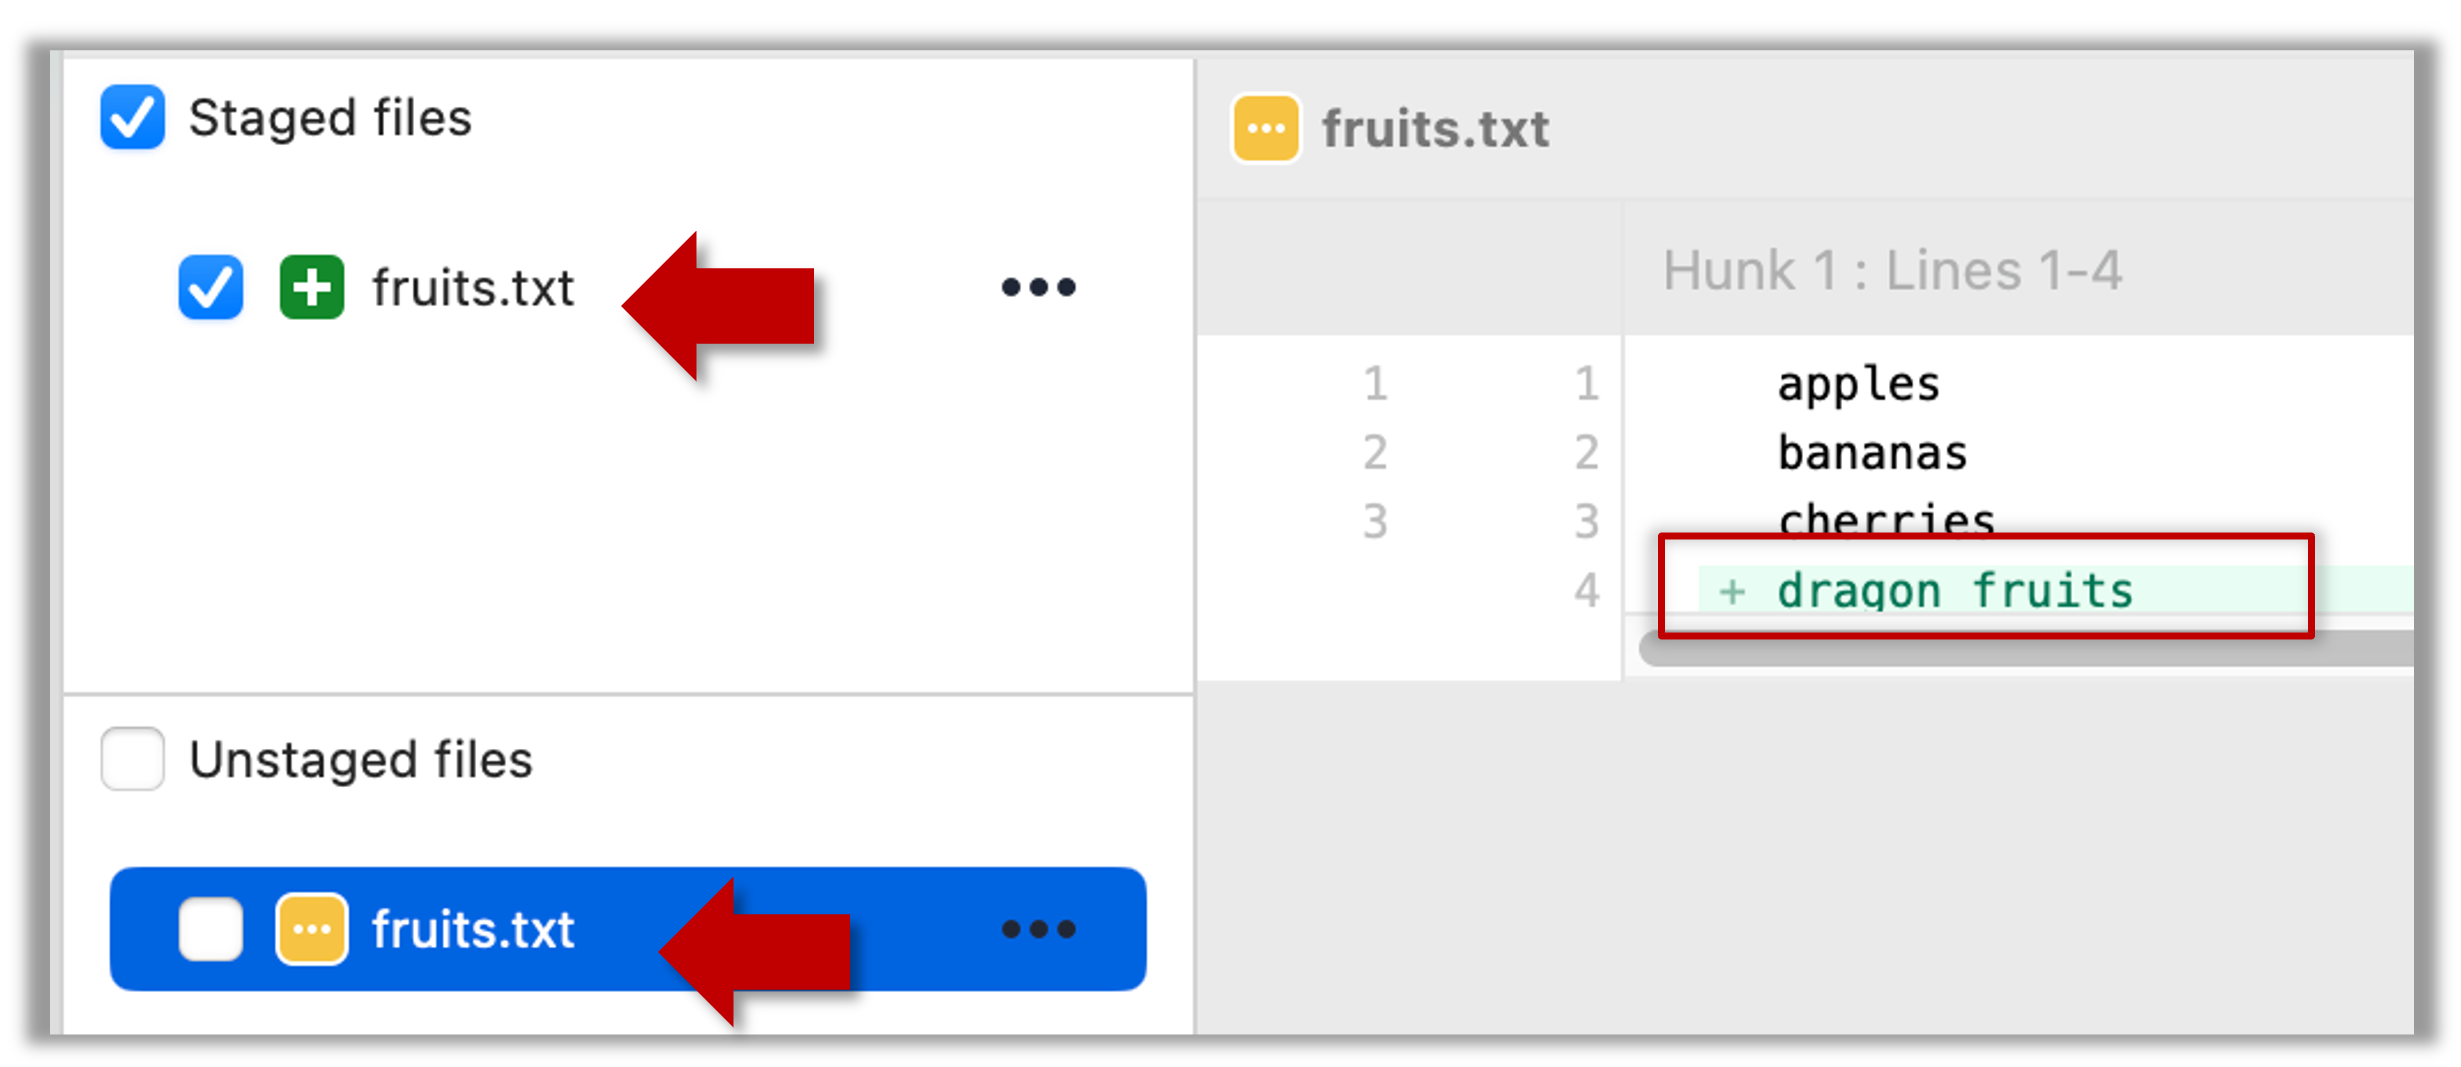
Note how fruits.txt now appears twice, once as new file: ... (representing the version of the file we staged earlier, which had only three lines) and once as modified: ... (representing the latest version of the file which now has a fourth line).
Note how fruits.txt appears in the Staged files panel as well as 'Unstaged files'.
3 Stage the file again, the same way you added/staged it earlier.
4 Verify that Git no longer sees it as 'modified', similar to step 2.
done!
Staging applies regardless of whether a file is currently tracked.
- Staging an untracked file will both begin tracking the file and include it in the next snapshot.
- Staging an already tracked file will simply mark its current changes for inclusion in the next commit.
Git also supports fine-grained selective staging i.e., staging only specific changes within a file while leaving other changes to the same file unstaged. This will be covered in a later lesson.
Git does not track empty folders. It tracks only folders that contain tracked files.
You can test this by adding an empty subfolder inside the things folder (e.g., things/more-things) and checking if it shows up as 'untracked' (it will not). If you add a file to that folder (e.g., things/more-things/food.txt) and then staged that file (e.g., git add more-things/food.txt), the folder will now be included in the next snapshot.
PRO-TIP: Applying a Git command to multiple files in one go
When a Git command expects a list of files or paths as a parameter (as the git add command does), these parameters are known as pathspecs — patterns that tell Git which files or directories to operate on. Pathspecs can be simple file names, directory names, or more complex patterns.
Here are some common ways to write them, shown with examples using the git add <pathspec> command:
Specify multiple files, separated by spaces:
git add f1.txt f2.txt data/lists/f3.txt # stages the specified three filesUse a glob pattern:
git add '*.txt' # stages all .txt files in the current directoryQuoting the glob pattern is recommended so your shell doesn’t expand it before Git sees it.
Use
.to indicate 'all in the current directory and subdirectories':git add . # stages all files in current directory and its subdirectoriesSpecific directory, to indicate 'this directory and its subdirectories':
git add path/to/dir # stages all files in path/to/dir and its subdirectoriesNegated pathspecs, to indicate 'except these':
git add . ':!*.log' # stage everything except .log files
Git supports combining these features — for example, you could add all .txt files except those in a certain folder using:
git add '*.txt' ':!docs/*.txt'
DETOUR: Unstaging Changes
You can unstage a staged file, which simply removes it from the staging area but keeps the changes in your working directory. This is useful if you later realise that you don’t actually want to include a staged file in the next commit — perhaps you staged it by mistake, or you want to include that change in a later commit.
To unstage a file you added or modified, run
git restore --staged <pathspec>. This command removes the file from the staging area, leaving your working directory untouched.git restore --staged plan.txt budget.txt data/list.txtIf your repo does not have any commits yet,
git restore --stagedwill fail with the error fatal: could not resolve HEAD.
The remedy is to usegit reset <pathspec>instead.git reset plan.txtIn fact,
git resetis an alternative way of unstaging files, and it works regardless of whether you have any commits.Wait. Then why does
git restore --stagedexists at all, given it is more verbose and doesn't even work in some special cases?
Answer: It is still considered the "modern" way of unstaging files (it was introduced more recently), because it is more intuitive and purpose-specific -- whereas thegit resetserves multiple purposes and, if used incorrectly, can cause unintended consequences.The
restorecommand can accept multiple files/paths as input, which means you can use the notation for specifying multiple files. For example, to unstage all changes you've staged, you can use thegit restore --staged .To unstage a file deletion (staged using
git rm), use the same command as above. It will unstage the deletion and restore the file in the staging area.
If you also deleted the file from your working directory, you may need to recover it separately withgit restore <file-name(s)>git restore data/list.txt data/plan.txtTo 'nuke' all changes (i.e., get rid of all staged and unstaged changes to tracked files), you can add the
--worktreeflag to thegit restore --staged <pathspec>command.git restore --staged --worktree . # nuke all changes in current folder and subfolders
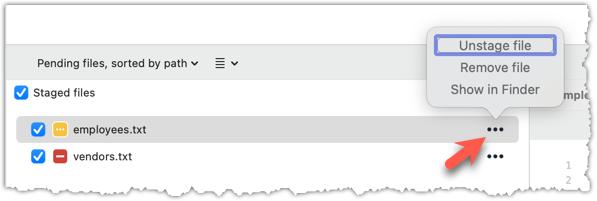
To unstage a file, locate the file among the staged files section, click the ... in front the file, and choose Unstage file: