Target Usage: To make use of the revision history stored by Git.
Motivation: Having put in effort to record the revision history of the working folder, it only makes sense that we use the revision history to our benefit. For example, to be able to answer questions such as "What did I change in this file since last Monday?"
Lesson plan:
T4L1. Examining a Commit covers that part.
T4L2. Tagging Commits covers that part.
T4L3. Comparing Points of History covers that part.
T4L4. Traversing to a Specific Commit covers that part.
T4L5. Rewriting History to Start Over covers that part.
T4L6. Reverting a Specific Commit covers that part.
It is useful to be able to see what changes were included in a specific commit.
When you examine a commit, normally what you see is the 'changes made since the previous commit'. This does not mean that a Git commit contains only the changes made since the previous commit. As you recall, a Git commit contains a full snapshot of the working directory. However, tools used to examine commits typically show only the changes, as that is the more informative part.
Git shows changes included in a commit by dynamically calculating the difference between the snapshots stored in the target commit and the parent commit. This is because Git commits store snapshots of the working directory, not changes themselves.
Although each commit represents a copy of the entire working directory, Git uses space efficiently in two main ways:
- Reuse of unchanged data: If a file hasn’t changed since a previous commit, the commit simply points to the already stored version of that file instead of making another copy. This means only new or changed files take up extra space, while unchanged files are reused.
- Compression: Git also compresses all the files and data it stores using an algorithm (zlib). So, even the objects that are stored (whether reused or new) take up less disk space because they are saved in a compressed format.
To address a specific commit, you can use its SHA (e.g., e60deaeb2964bf2ebc907b7416efc890c9d4914b). In fact, just the first few characters of the SHA is enough to uniquely address a commit (e.g., e60deae), provided the partial SHA is long enough to uniquely identify the commit (i.e., only one commit has that partial SHA).
Naturally, a commit can be addressed using any ref pointing to it too (e.g., HEAD, master).
Another related technique is to use the <ref>~<n> notation (e.g., HEAD~1) to address the commit that is n commits prior to the commit pointed by <ref> i.e., "start with the commit pointed by <ref> and go back n commits".
A related alternative notation is HEAD~, HEAD~~, HEAD~~~, ... to mean HEAD~1, HEAD~2, HEAD~3 etc.
HEAD or masterHEAD~1 or master~1 or HEAD~ or master~HEAD~2 or master~2Git uses the diff format to show file changes in a commit. The diff format was originally developed for Unix. It was later extended with headers and metadata to show changes between file versions and commits. Here is an example diff showing the changes to a file.
diff --git a/fruits.txt b/fruits.txt
index 7d0a594..f84d1c9 100644
--- a/fruits.txt
+++ b/fruits.txt
@@ -1,6 +1,6 @@
-apples
+apples, apricots
bananas
cherries
dragon fruits
-elderberries
figs
@@ -20,2 +20,3 @@
oranges
+pears
raisins
diff --git a/colours.txt b/colours.txt
new file mode 100644
index 0000000..55c8449
--- /dev/null
+++ b/colours.txt
@@ -0,0 +1 @@
+a file for colours
A Git diff can consist of multiple file diffs, one for each changed file. Each file diff can contain one or more hunk i.e., a localised group of changes within the file — including lines added, removed, or left unchanged (included for context).
Given below is how the above diff is divided into its components:
File diff for fruits.txt:
diff --git a/fruits.txt b/fruits.txt
index 7d0a594..f84d1c9 100644
--- a/fruits.txt
+++ b/fruits.txt
Hunk 1:
@@ -1,6 +1,6 @@
-apples
+apples, apricots
bananas
cherries
dragon fruits
-elderberries
figs
Hunk 2:
@@ -20,2 +20,3 @@
oranges
+pears
raisins
File diff for colours.txt:
diff --git a/colours.txt b/colours.txt
new file mode 100644
index 0000000..55c8449
--- /dev/null
+++ b/colours.txt
Hunk 1:
@@ -0,0 +1 @@
+a file for colours
Here is an explanation of the diff:
| Part of Diff | Explanation |
|---|---|
diff --git a/fruits.txt b/fruits.txt | The diff header, indicating that it is comparing the file fruits.txt between two versions: the old (a/) and new (b/). |
index 7d0a594..f84d1c9 100644 | Shows the before and after the change, and the file mode (100 means a regular file, 644 are file permission indicators). |
--- a/fruits.txt+++ b/fruits.txt | Marks the old version of the file (a/fruits.txt) and the new version of the file (b/fruits.txt). |
| This hunk header shows that lines 1-6 (i.e., starting at line 1, showing 6 lines) in the old file were compared with lines 1–6 in the new file. |
-apples+apples, apricots | Removed line apples and added line apples, apricots. |
bananascherriesdragon fruits | Unchanged lines, shown for context. |
-elderberries | Removed line: elderberries. |
figs | Unchanged line, shown for context. |
| Hunk header showing that lines 20-21 in the old file were compared with lines 20–22 in the new file. |
oranges+pearsraisins | Unchanged line. Added line: pears.Unchanged line. |
diff --git a/colours.txt b/colours.txt | The usual diff header, indicates that Git is comparing two versions of the file colours.txt: one before and one after the change. |
new file mode 100644 | This is a new file being added. 100644 means it’s a normal, non-executable file with standard read/write permissions. |
index 0000000..55c8449 | The usual SHA hashes for the two versions of the file. 0000000 indicates the file did not exist before. |
--- /dev/null+++ b/colours.txt | Refers to the "old" version of the file (/dev/null means it didn’t exist before), and the new version. |
@@ -0,0 +1 @@ | Hunk header, saying: “0 lines in the old file were replaced with 1 line in the new file, starting at line 1.” |
+a file for colours | Added line |
Points to note:
+indicates a line being added.
-indicates a line being deleted.- Editing a line is seen as deleting the original line and adding the new line.
TargetView contents of specific commits in a repo.
Preparation You can use any repo that has commits e.g., the things repo.
1 Locate the commits to view, using the revision graph.
git log --oneline --decorate
e60deae (HEAD -> master, origin/master) Update fruits list
f761ea6 Add colours.txt, shapes.txt
2bedace Add figs to fruits.txt
d5f91de Add fruits.txt
2 Use the git show command to view specific commits.
git show # shows the latest commit
commit e60deaeb2964bf2ebc907b7416efc890c9d4914b (HEAD -> master, origin/master)
Author: damithc <...@...>
Date: Sat Jun ...
Update fruits list
diff --git a/fruits.txt b/fruits.txt
index 7d0a594..6d502c3 100644
--- a/fruits.txt
+++ b/fruits.txt
@@ -1,6 +1,6 @@
-apples
+apples, apricots
bananas
+blueberries
cherries
dragon fruits
-elderberries
figs
To view the parent commit of the latest commit, you can use any of these commands:
git show HEAD~1
git show master~1
git show e60deae # first few characters of the SHA
git show e60deae..... # run git log to find the full SHA and specify the full SHA
To view the commit that is two commits before the latest commit, you can use git show HEAD~2 etc.
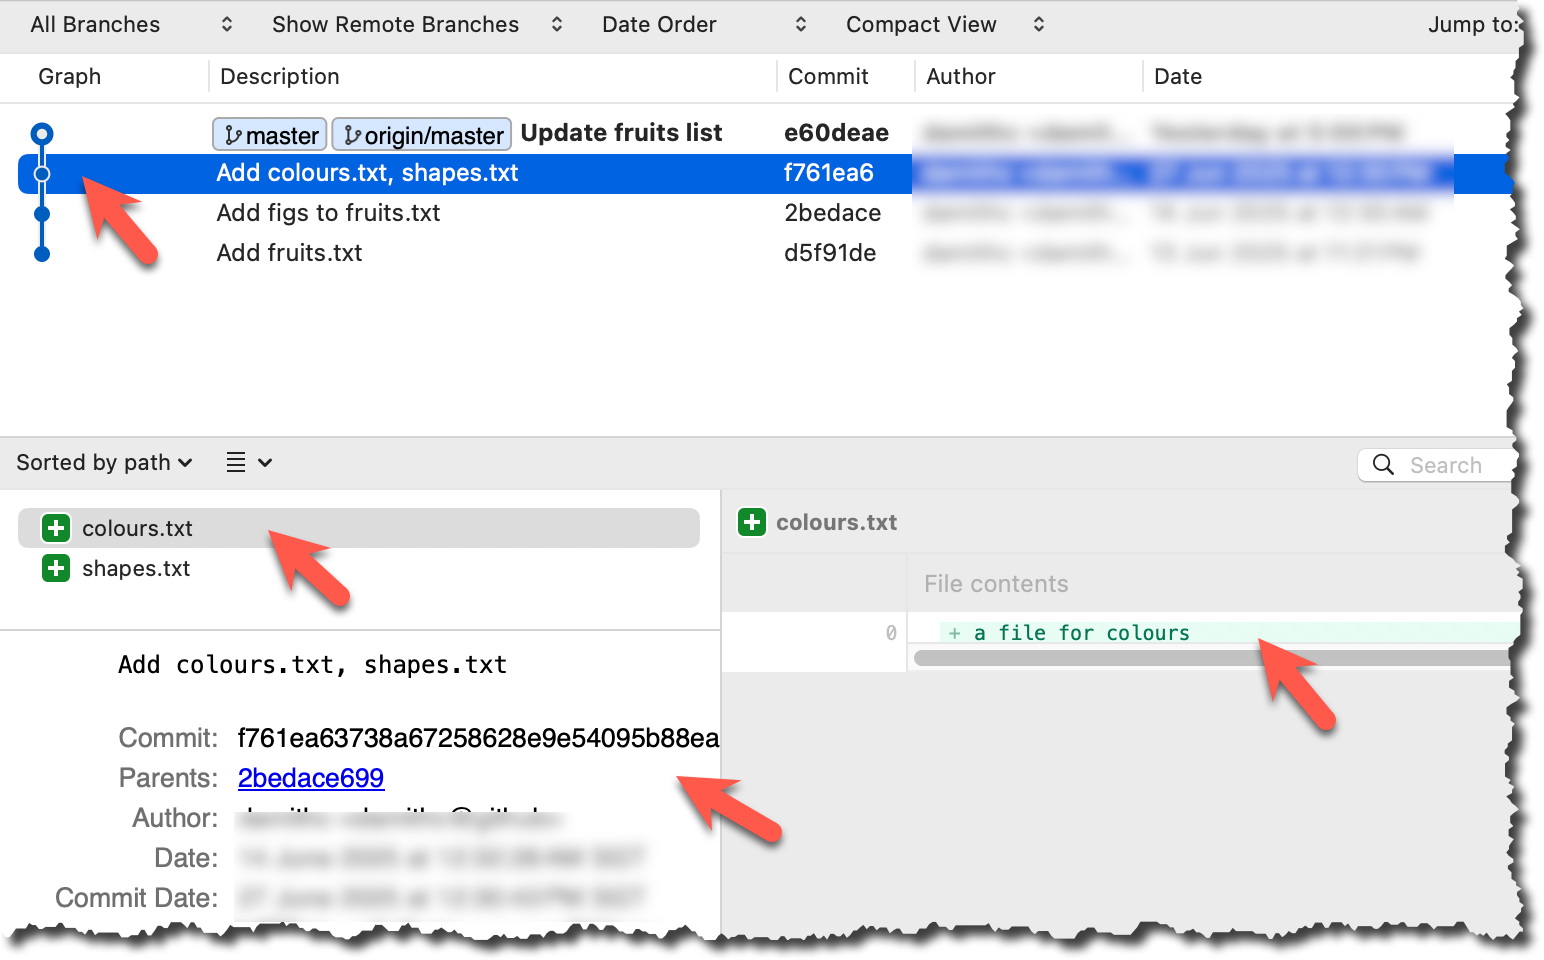
Click on the commit. The remaining panels (indicated in the image below) will be populated with the details of the commit.
done!
PRO-TIP: Use Git Aliases to Work Faster
The Git alias feature allows you to create custom shortcuts for frequently used Git commands. This saves time and reduces typing, especially for long or complex commands. Once an alias is defined, you can use the alias just like any other Git command e.g., use git lodg as an alias for git log --oneline --decorate --graph.
To define a global git alias, you can use the git config --global alias.<alias> "<command>" command. e.g.,
git config --global alias.lodg "log --oneline --graph --decorate"
You can also create shell-level aliases using your shell configuration (e.g., .bashrc, .zshrc) to make even shorter aliases. This lets you create shortcuts for any command, including Git commands, and even combine them with other tools. e.g., instead of the Git alias git lodg, you can define a shorter shell-level alias glodg.
1. Locate your .bash_profile file (likely to be in : C:\Users\<YourName>\.bash_profile -- if it doesn’t exist, create it.)
1. Locate your shell's config file e.g., .bashrc or .zshrc (likely to be in your ~ folder)
1. Locate your shell's config file e.g., .bashrc or .zshrc (likely to be in your ~ folder)
Oh-My-Zsh for Zsh terminal supports a Git plugin that adds a wide array of Git command aliases to your terminal.
2. Add aliases to that file:
alias gs='git status'
alias glod='git log --oneline --graph --decorate'
3. Apply changes by running the command source ~/.zshrc or source ~/.bash_profile or source ~/.bashrc, depending on which file you put the aliases in.
When working with many commits, it helps to tag specific commits with custom names so they’re easier to refer to later.
Git lets you tag commits with names, making them easy to reference later. This is useful when you want to mark specific commits -- such as releases or key milestones (e.g., v1.0 or v2.1). Using tags to refer to commits is much more convenient than using SHA hashes. In the diagram below, v1.0 and interim are tags.
A tag stays fixed to the commit. Unlike branch refs or HEAD, tags do not move automatically as new commits are made. As you see below, after adding a new commit, tags stay in the previous commits while master←HEAD has moved to the new commit.
Git supports two kinds of tags:
- A lightweight tag is just a ref that points directly to a commit, like a branch that doesn’t move.
- An annotated tag is a full Git object that stores a reference to a commit along with metadata such as the tagger’s name, date, and a message.
Annotated tags are generally preferred for versioning and public releases, while lightweight tags are often used for less formal purposes, such as marking a commit for your own reference.
Target Add a few tags to a repository.
Preparation Fork and clone the samplerepo-preferences. Use the cloned repo on your computer for the following steps.
1 Add a lightweight tag to the current commit as v1.0:
git tag v1.0
2 Verify the tag was added. To view tags:
git tag
v1.0
To view tags in the context of the revision graph:
git log --oneline --decorate
507bb74 (HEAD -> master, tag: v1.0, origin/master, origin/HEAD) Add donuts
de97f08 Add cake
5e6733a Add bananas
3398df7 Add food.txt
3 Use the tag to refer to the commit e.g., git show v1.0 should show the changes in the tagged commit.
4 Add an annotated tag to an earlier commit. The example below adds a tag v0.9 to the commit HEAD~2 with the message First beta release. The -a switch tells Git this is an annotated tag.
git tag -a v0.9 HEAD~2 -m "First beta release"
5 Check the new annotated tag. While both types of tags appear similarly in the revision graph, the show command on an annotated tag will show the details of the tag and the details of the commit it points to.
git show v0.9
tag v0.9
Tagger: ... <...@...>
Date: Sun Jun ...
First beta release
commit ....999087124af... (tag: v0.9)
Author: ... <...@...>
Date: Sat Jun ...
Add figs to fruits.txt
diff --git a/fruits.txt b/fruits.txt
index a8a0a01..7d0a594 100644
# rest of the diff goes here
Right-click on the commit (in the graphical revision graph) you want to tag and choose Tag….
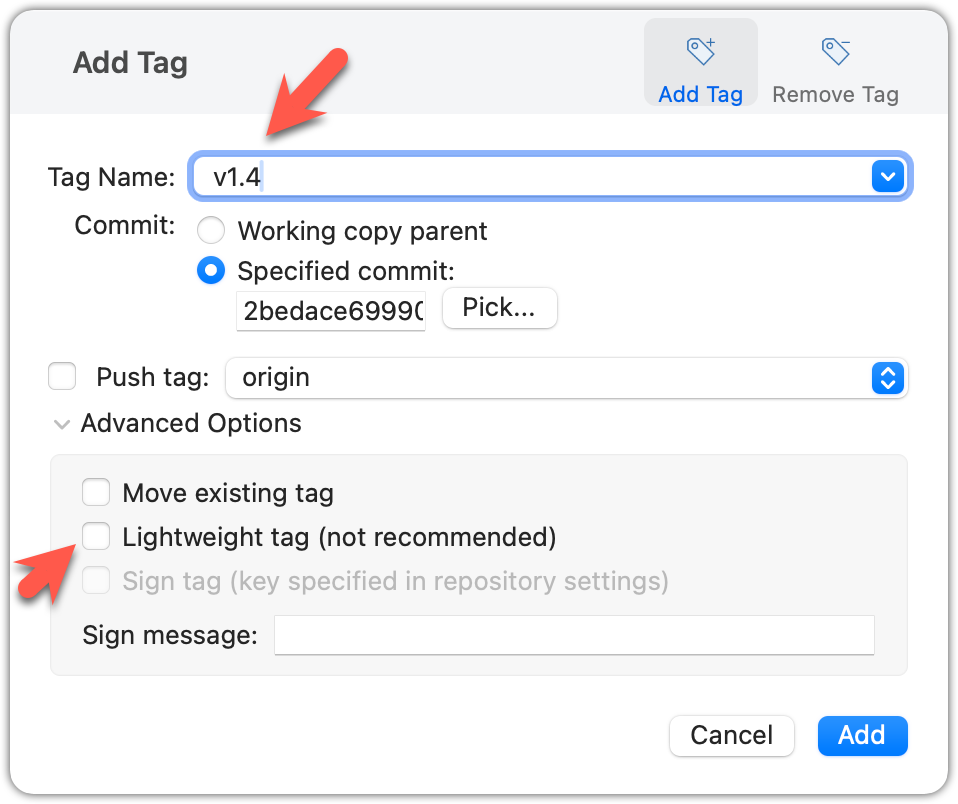
Specify the tag name e.g., v1.0 and click Add Tag.
Configure tag properties in the next dialog and press Add. For example, you can choose whether to make it a lightweight tag or an annotated tag (default).
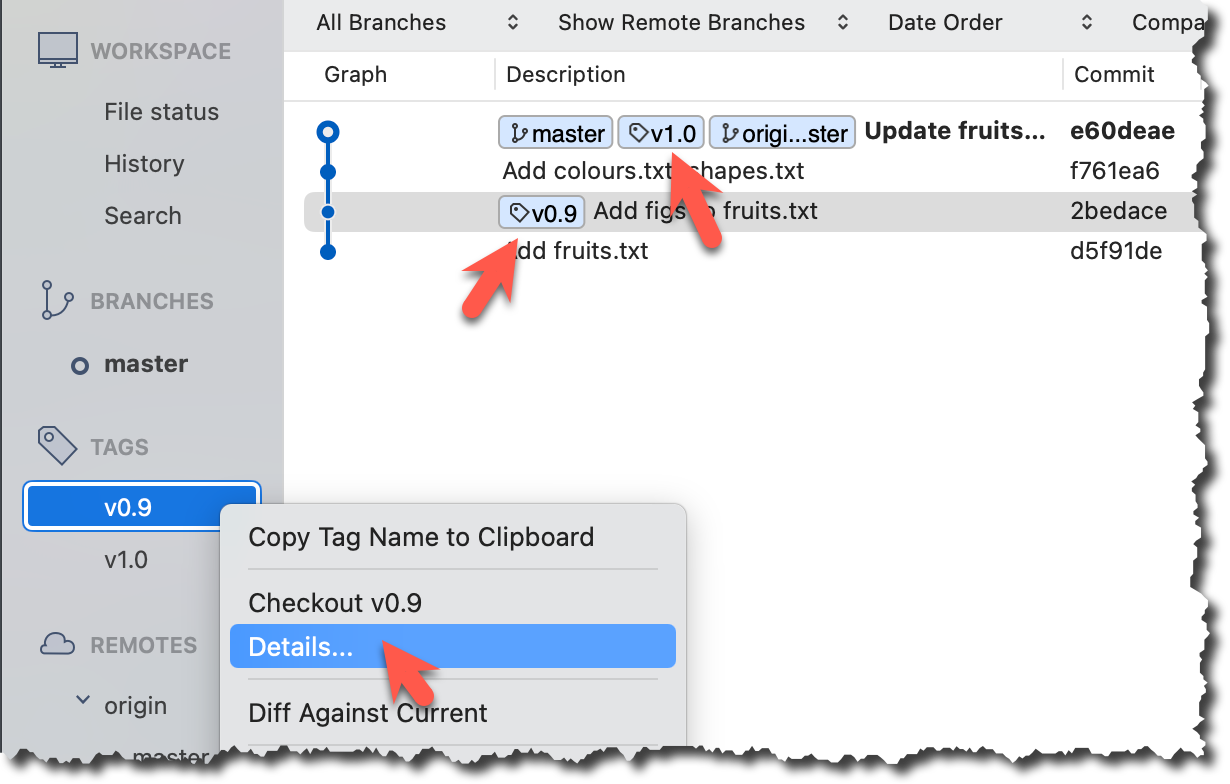
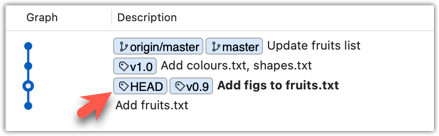
Tags will appear as labels in the revision graph, as seen below. To see the details of an annotated tag, you need to use the menu indicated in the screenshot.
done!
If you need to change what a tag points to, you must delete the old one and create a new tag with the same name. This is because tags are designed to be fixed references to a specific commit, and there is no built-in mechanism to 'move' a tag.
Preparation Continue with the same repo you used for the previous hands-on practical.
Move the v1.0 tag to the commit HEAD~1, by deleting it first and creating it again at the destination commit.
Delete the previous v1.0 tag by using the -d . Add it again to the other commit, as before.
git tag -d v1.0
git tag v1.0 HEAD~1
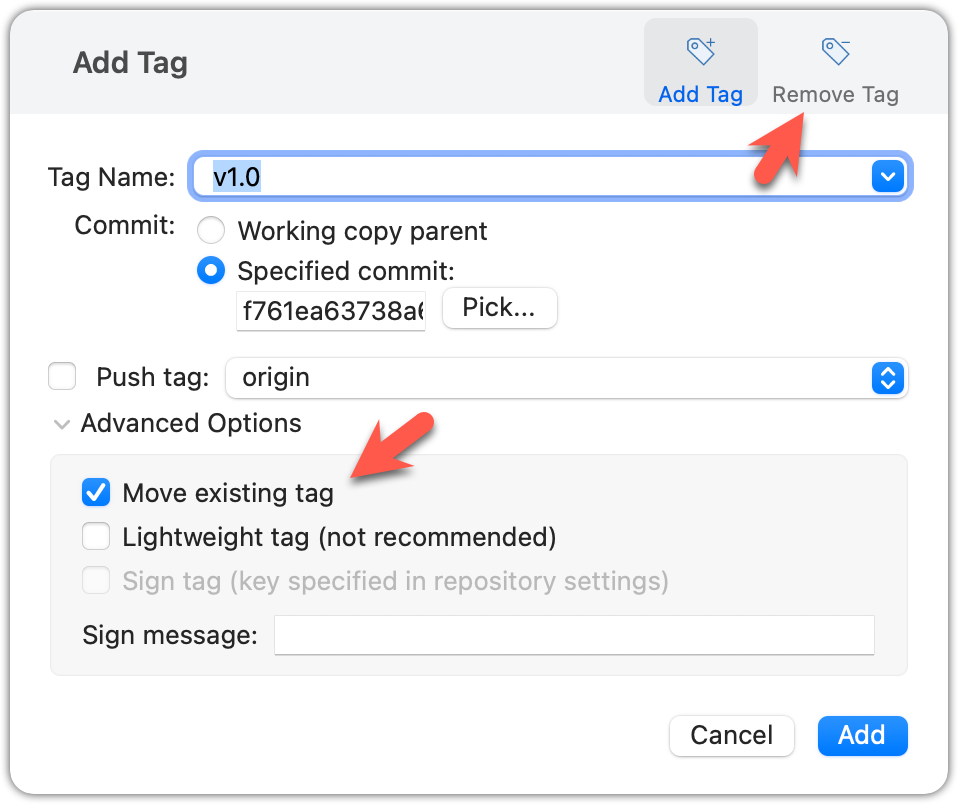
The same dialog used to add a tag can be used to delete and even move a tag. Note that the 'moving' here translates to deleting and re-adding behind the scene.
done!
Tags are different from commit messages, in purpose and in form. A commit message is a description of the commit that is part of the commit itself. A tag is a short name for a commit, which you can use to address a commit.
Pushing commits to a remote does not push tags automatically. You need to push tags specifically.
Target Push tags you created earlier to the remote.
Preparation Continue with the same repo you used for the previous hands-on practical.
You can go to your remote on GitHub link https://github.com/{USER}/{REPO}/tags (e.g., https://github.com/johndoe/samplerepo-preferences/tags) to verify the tag is present there.
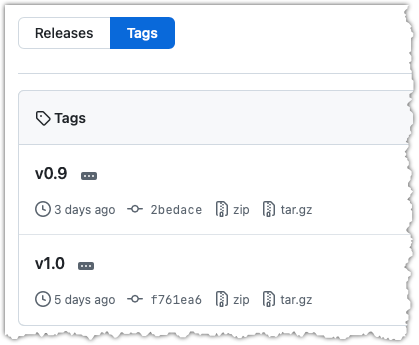
Note how GitHub assumes these tags are meant as releases, and automatically provides zip and tar.gz archives of the repo (as at that tag).
1 Push a specific tag in the local repo to the remote (e.g., v1.0) using the git push <remote> <tag-name> command.
git push origin v1.0
In addition to verifying the tag's presence via GitHub, you can also use the following command to list the tags presently in the remote.
git ls-remote --tags origin
2 Delete a tag in the remote, using the git push --delete <remote> <tag-name> command.
git push --delete origin v1.0
3 Push all tags to the remote repo, using the git push <remote> --tags command.
git push origin --tags
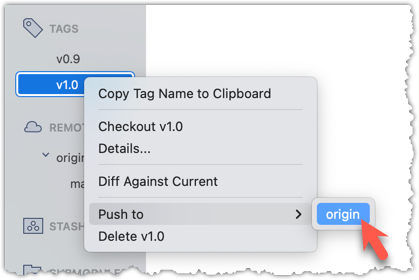
To push a specific tag, use the following menu:
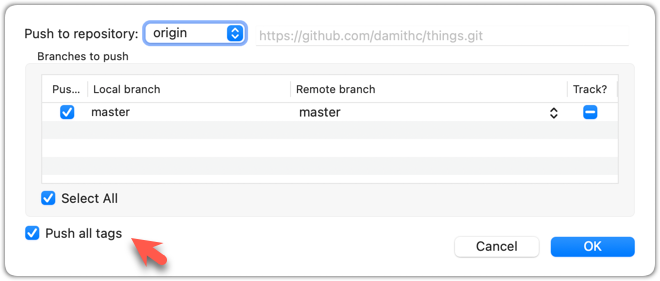
To push all tags, you can tick the Push all tags option when pushing commits:
done!
Git can tell you the net effect of changes between two points of history.
Git's diff feature can show you what changed between two points in the revision history. Given below are some use cases.
Usage 1: Examining changes in the working directory
Example use case: To verify the next commit will include exactly what you intend it to include.
Preparation For this, you can use the things repo you created earlier. If you don't have it, you can clone a copy of a similar repo given here.
1 Do some changes to the working directory. Stage some (but not all) changes. For example, you can run the following commands.
echo -e "blue\nred\ngreen" >> colours.txt
git add . # a shortcut to stage all changes
echo "no shapes added yet" >> shapes.txt
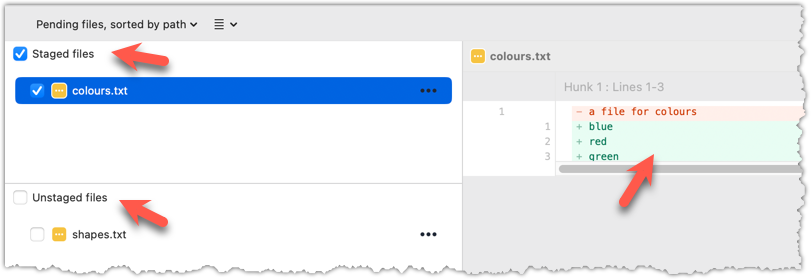
2 Examine the staged and unstaged changes.
The git diff command shows unstaged changes in the working directory (tracked files only). The output of the diff command, is a diff view (introduced in this lesson).
git diff
diff --git a/shapes.txt b/shapes.txt
index 5c2644b..949c676 100644
--- a/shapes.txt
+++ b/shapes.txt
@@ -1 +1,2 @@
a file for shapes
+no shapes added yet!
The git diff --staged command shows the staged changes (same as git diff --cached).
git diff --staged
Select the two commits: Click on one commit, and Ctrl-Click (or Cmd-Click) on the second commit. The changes between the two selected commits will appear in the other panels, as shown below:
done!
Usage 2: Comparing two commits at different points of the revision graph
Example use case: Suppose you’re trying to improve the performance of a piece of software by experimenting with different code tweaks. You commit after each change (as you should). After several commits, you now want to review the overall effect of all those changes on the code.
Target Compare two commits in a repo.
Preparation You can use any repo with multiple commits e.g., the things repo.
You can use the git diff <commit1> <commit2> command for this.
- You may use any valid way to refer to commits (e.g., SHA, tag, HEAD~n etc.).
- You may also use the
..notation to specify the commit range too e.g.,0023cdd..fcd6199,HEAD~2..HEAD
git diff v0.9 HEAD
diff --git a/colours.txt b/colours.txt
new file mode 100644
index 0000000..55c8449
--- /dev/null
+++ b/colours.txt
@@ -0,0 +1 @@
+a file for colours
# rest of the diff ...
Swap the commit order in the command and see what happens.
git diff HEAD v0.9
diff --git a/colours.txt b/colours.txt
deleted file mode 100644
index 55c8449..0000000
--- a/colours.txt
+++ /dev/null
@@ -1 +0,0 @@
-a file for colours
# rest of the diff ...
As you can see, the diff is directional i.e., diff <commit1> <commit2> shows what changes you need to do to go from the <commit1> to <commit2>. If you swap <commit1> and <commit2>, the output will change accordingly e.g., lines previously shown as 'added' will now be shown as 'deleted'.
Select the two commits: Click on one commit, and Ctrl-Click (or Cmd-Click) on the second commit. The changes between the two selected commits will appear in the other panels, as shown below:
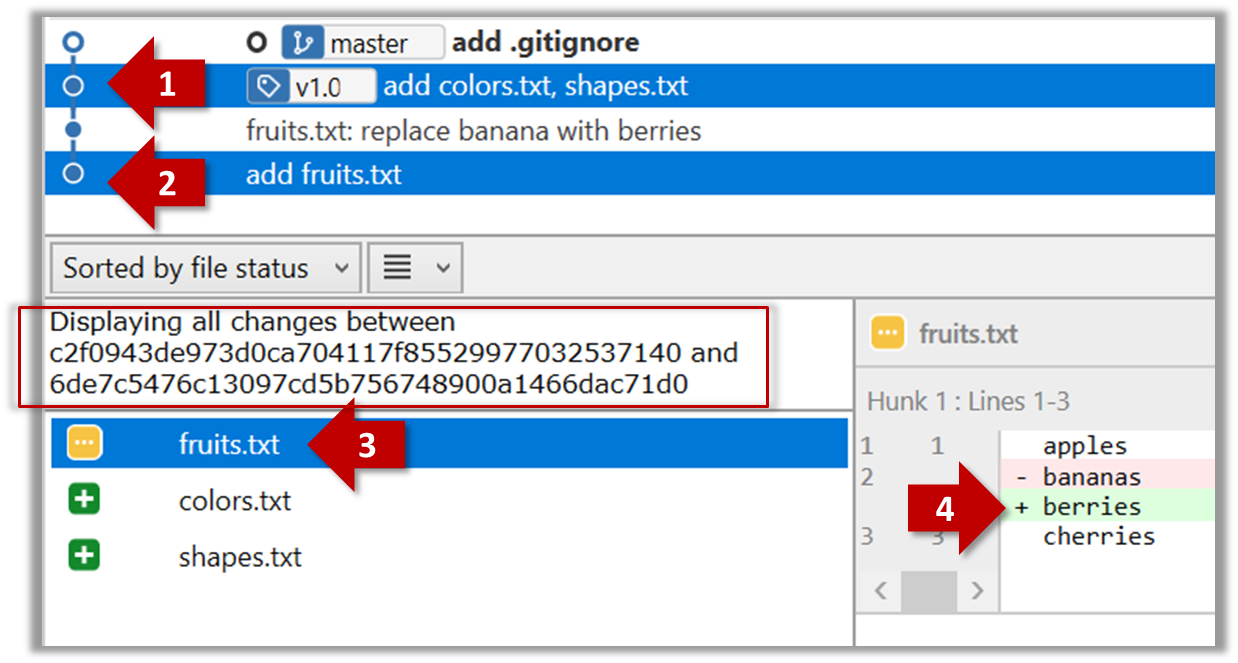
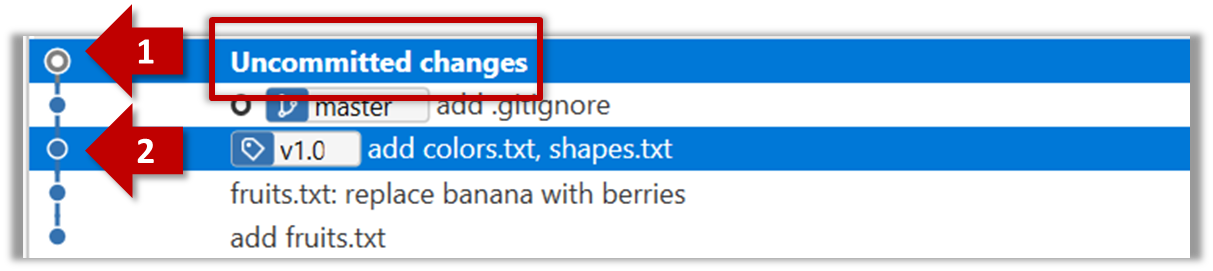
The same method can be used to compare the current state of the working directory (which might have uncommitted changes) to a point in the history.
done!
Usage 3: Examining changes to a specific file
Example use case: Similar to other use cases but when you are interested in a specific file only.
Target Examine the changes done to a file between two different points in the version history (including the working directory).
Preparation Use any repo with multiple commits e.g. the things repo.
Add the -- path/to/file to a previous diff command to narrow the output to a specific file. Some examples:
git diff -- fruits.txt # unstaged changes to fruits.txt
git diff --staged -- src/main.java # staged changes to src/main.java
git diff HEAD~2..HEAD -- fruits.txt # changes to fruits.txt between commits
Sourcetree UI shows changes to one file at a time by default; just click on the file to view changes to that file. To view changes to multiple files, Ctrl-Click (or Cmd-Click) on multiple files to select them.
done!
Another useful feature of revision control is to be able to view the working directory as it was at a specific point in history, by checking out a commit created at that point.
Suppose you added a new feature to a software product, and while testing it, you noticed that another feature added two commits ago doesn’t handle a certain edge case correctly. Now you’re wondering: did the new feature break the old one, or was it already broken? Can you go back to the moment you committed the old feature and test it in isolation, and come back to the present after you found the answer? With Git, you can.
To view the working directory at a specific point in history, you can check out a commit created at that point.
When you check out a commit, Git:
- Updates your working directory to match the snapshot in that commit, overwriting current files as needed.
- Moves the
HEADref to that commit, marking it as the current state you’re viewing.
→
[check out commit C2...]
Checking out a specific commit puts you in a "detached HEAD" state: i.e., the HEAD no longer points to a branch, but directly to a commit (see the above diagram for an example). This isn't a problem by itself, but any commits you make in this state can be lost, unless certain follow-up actions are taken. It is perfectly fine to be in a detached state if you are only examining the state of the working directory at that commit.
To get out of a "detached HEAD" state, you can simply check out a branch, which "re-attaches" HEAD to the branch you checked out.
→
[check out master...]
Target Checkout a few commits in a local repo, while examining the working directory to verify that it matches the state when you created the corresponding commit
Preparation Use any repo with commits e.g., the things repo
1 Examine the revision tree, to get your bearing first.
git log --oneline --decorate
Reminder: You can use aliases to reduce typing Git commands.
e60deae (HEAD -> master, origin/master) Update fruits list
f761ea6 (tag: v1.0) Add colours.txt, shapes.txt
2bedace (tag: v0.9) Add figs to fruits.txt
d5f91de Add fruits.txt
2 Use the checkout <commit-identifier> command to check out a commit other than the one currently pointed by HEAD. You can use any of the following methods:
git checkout v1.0: checks out the commit taggedv1.0git checkout 0023cdd: checks out the commit with the hash0023cddgit checkout HEAD~2: checks out the commit 2 commits behind the most recent commit.
git checkout HEAD~2
Note: switching to 'HEAD~2'.
You are in 'detached HEAD' state.
# rest of the warning about the detached head ...
HEAD is now at 2bedace Add figs to fruits.txt
3 Verify HEAD and the working directory have updated as expected.
HEADshould now be pointing at the target commit- The working directory should match the state it was in at that commit (e.g., files added after that commit -- such as
shapes.txtshould not be in the folder).
git log --oneline --decorate
2bedace (HEAD, tag: v0.9) Add figs to fruits.txt
d5f91de Add fruits.txt
HEAD is indeed pointing at the target commit.
But note how the output does not show commits you added after the checked-out commit.
The --all switch tells git log to show commits from all refs, not just those reachable from the current HEAD. This includes commits from other branches, tags, and remotes.
git log --oneline --decorate --all
e60deae (origin/master, master) Update fruits list
f761ea6 (tag: v1.0) Add colours.txt, shapes.txt
2bedace (HEAD, tag: v0.9) Add figs to fruits.txt
d5f91de Add fruits.txt
4 Go back to the latest commit by checking out the master branch again.
git checkout master
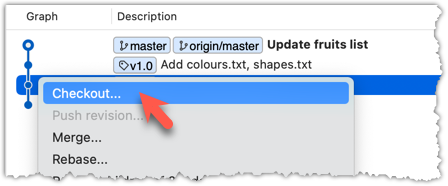
In the revision graph, double-click the commit you want to check out, or right-click on that commit and choose Checkout....
Click OK to the warning about ‘detached HEAD’ (similar to below).
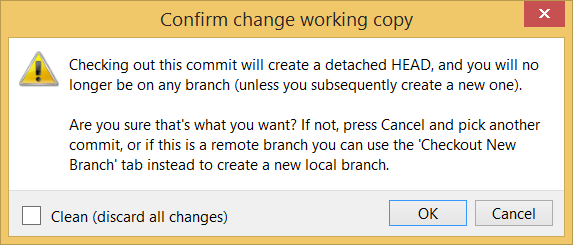
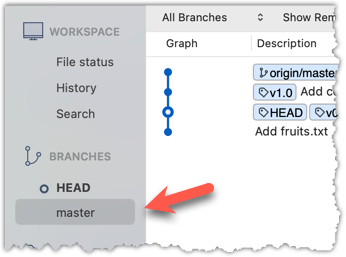
The specified commit is now loaded onto the working folder, as indicated by the HEAD label.
To go back to the latest commit on the master branch, double-click the master branch.
If you check out a commit that comes before the commit in which you added a certain file (e.g., temp.txt) to the .gitignore file, and if the .gitignore file is version controlled as well, Git will now show it under ‘unstaged modifications’ because at Git hasn’t been told to ignore that file yet.
done!
If there are uncommitted changes in the working directory, Git proceeds with a checkout only if it can preserve those changes.
- Example 1: There is a new file in the working directory that is not committed yet.
→ Git will proceed with the checkout and will keep the uncommitted file as well. - Example 2: There is an uncommitted change to a file that conflicts with the version of that file in the commit you wish to check out.
→ Git will abort the checkout, and the repo will remain in the current commit.
The Git stash feature temporarily sets aside uncommitted changes you’ve made (in your working directory and staging area), without committing them. This is useful when you’re in the middle of some work, but need to switch to another state (e.g., checkout a previous commit), and your current changes are not yet ready to be committed or discarded. You can later reapply the stashed changes when you’re ready to resume that work.
Git can also reset the revision history to a specific point so that you can start over from that point.
Suppose you realise your last few commits have gone in the wrong direction, and you want to go back to an earlier commit and continue from there — as if the “bad” commits never happened. Git’s reset feature can help you do that.
Git reset moves the tip of the current branch to a specific commit, optionally adjusting your staged and unstaged changes to match. This effectively rewrites the branch's history by discarding any commits that came after that point.
Resetting is different from the checkout feature:
- Reset: Lets you start over from a past state. It rewrites history by moving the branch ref to a new location.
- Checkout: Lets you explore a past state without rewriting history. It just moves the
HEADref.
→
[reset to C2...]
master branch!There are three types of resets: soft, mixed, hard. All three move the branch pointer to a new commit, but they vary based on what happens to the staging area and the working directory.
- soft reset: Moves the cumulative changes from the discarded commits into the staging area, waiting to be committed again. Any staged and unstaged changes that existed before the reset will remain untouched.
- mixed reset: Cumulative changes from the discarded commits, and any existing staged changes, are moved into the working directory.
- hard reset: All staged and unstaged changes are discarded. Both the working directory and the staging area are aligned with the target commit (as if no changes were done after that commit).
Preparation First, set the stage as follows (e.g., in the things repo):
i) Add four commits that are supposedly 'bad' commits.
ii) Do a 'bad' change to one file and stage it.
iii) Do a 'bad' change to another file, but don't stage it.
The following commands can be used to add commits B1-B4:
echo "bad colour" >> colours.txt
git add colours.txt
git commit -m "Incorrectly update colours.txt"
echo "bad shape" >> shapes.txt
git add shapes.txt
git commit -m "Incorrectly update shapes.txt"
echo "bad fruit" >> fruits.txt
git add fruits.txt
git commit -m "Incorrectly update fruits.txt"
echo "bad line" >> incorrect.txt
git add incorrect.txt
git commit -m "Add incorrect.txt"
echo "another bad colour" >> colours.txt
git add colours.txt
echo "another bad shape" >> shapes.txt
Now we have some 'bad' commits and some 'bad' changes in both the staging area and the working directory. Let's use the reset feature to get rid of all of them, but do it in three steps so that you can learn all three types of resets.
1 Do a soft reset to B2 (i.e., discard last two commits). Verify,
- the
masterbranch is now pointing atB2, and, - the changes that were in the discarded commits (i.e.,
B3andB4) are now in the staging area.
Use the git reset --soft <commit> command to do a soft reset.
git reset --soft HEAD~2
You can run the following commands to verify the current status of the repo is as expected.
git status # check overall status
git log --oneline --decorate # check the branch tip
git diff # check unstaged changes
git diff --staged # check staged changes
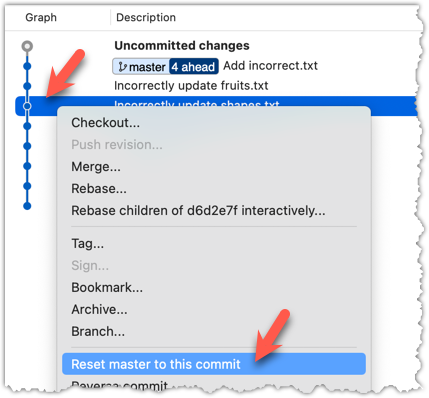
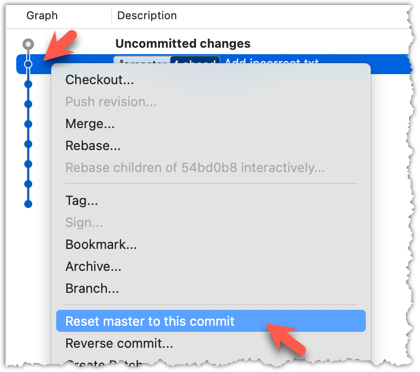
Right-click on the commit that you want to reset to, and choose Reset <branch-name> to this commit option.
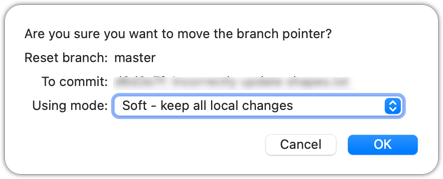
In the next dialog, choose Soft - keep all local changes.
2 Do a mixed reset to commit B1. Verify,
- the
masterbranch is now pointing atB1. - the staging area is empty.
- the accumulated changes from all three discarded commits (including those from the previous soft reset) are now appearing as unstaged changes in the working directory.
Note howincorrect.txtappears as an 'untracked' file -- this is because unstaging a change of type 'add file' results in an untracked file.
Use the git reset --mixed <commit> command to do a mixed reset. The --mixed flag is the default, and can be omitted.
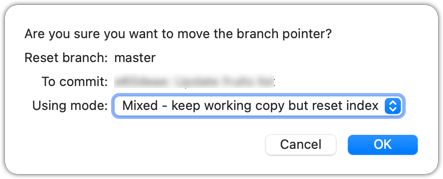
git reset HEAD~1
Verify the repo status, as before.
Similar to the previous reset, but choose the Mixed - keep working copy but reset index option in the reset dialog.
3 Do a hard reset to commit C4. Verify,
- the
masterbranch is now pointing atC4i.e., all 'bad' commits are gone. - the staging area is empty.
- there are no unstaged changes (except for the untracked files
incorrect.txt-- Git leaves untracked files alone, as untracked files are not meant to be under Git's control).
Use the git reset --hard <commit> command.
git reset --hard HEAD~1
Verify the repo status, as before.
Similar to the previous reset, but choose the Hard - discard all working copy changes option.
done!
Rewriting history can cause your local repo to diverge from its remote counterpart. For example, if you discard earlier commits and create new ones in their place, and you’ve already pushed the original commits to a remote repository, your local branch history will no longer match the corresponding remote branch. Git refers to this as a diverged history.
To protect the integrity of the remote, Git will reject attempts to push a diverged branch using a normal push. If you want to overwrite the remote history with your local version, you must perform a force push.
Preparation Choose a local-remote repo pair under your control e.g., the things repo from Tour 2: Backing up a Repo on the Cloud.
1 Rewrite the last commit: Reset the current branch back by one commit, and add a new commit.
For example, you can use the following commands.
git reset --hard HEAD~1
echo "water" >> drinks.txt
git add .
git commit -m "Add drinks.txt"
2 Observe how the local branch is diverged.
git log --oneline --graph --all
* fc1d04e (HEAD -> master) Add drinks.txt
| * e60deae (upstream/master, origin/master) Update fruits list
|/
* f761ea6 (tag: v1.0) Add colours.txt, shapes.txt
* 2bedace (tag: v0.9) Add figs to fruits.txt
* d5f91de Add fruits.txt
3 Attempt to push to the remote. Observe Git rejects the push.
git push origin master
To https://github.com/.../things.git
! [rejected] master -> master (non-fast-forward)
error: failed to push some refs to 'https://github.com/.../things.git'
hint: Updates were rejected because the tip of your current branch is behind
hint: its remote counterpart. If you want to integrate the remote changes,
hint: ...
4 Do a force-push.
You can use the --force (or -f) flag to force push.
git push -f origin master
A safer alternative to --force is --force-with-lease which overwrites the remote branch only if it hasn’t changed since you last fetched it (i.e., only if remote doesn't have recent changes that you are unaware of):
git push --force-with-lease origin master
done!
DETOUR: Resetting Uncommitted Changes
At times, you might need to get rid of uncommitted changes so that you have a fresh start to the next commit.
To get rid of uncommitted changes, you can reset the repo to the last commit (i.e., HEAD):
The command git reset (without specifying a commit) defaults to git reset HEAD.
git reset: moves any staged changes to working directory (i.e., unstage).git reset --hard: get rid of any staged and unstaged changes.
At this point: You should now be able to use a repository’s revision history to understand how the working directory evolved over time -- and use that insight to inform your work.
How useful this history is depends greatly on how well it was constructed -- for example, how frequently and meaningfully commits were made -- we’ll explore that in a later tour.
What's next: Tour 5: Fine-Tuning the Revision History