Target Usage: To use Git to systematically record the history of a folder in your own computer. More specifically, to use Git to save a snapshot of the folder at specific points of time.
Motivation: Recording the history of files in a folder (e.g, code files of a software project, case notes, files related to an article/book that you are authoring) can be useful in case you need to refer to past versions.
Lesson plan:
T1L1. Introduction to Revision Control covers that part.
T1L2. Preparing to Use Git covers that part.
T1L3. Putting a Folder Under Git's Control covers that part.
T1L4. Specifying What to Include in a Snapshot covers that part.
T1L5. Saving a Snapshot covers that part.
T1L6. Examining the Revision History covers that part.
Before you start learning Git, you need to install some tools on your computer.
Installing Git
Git is a free and open source software used for revision control. To use Git, you need to install Git on your computer.
PREPARATION: Install Git
Download the Git installer from the official Git website.
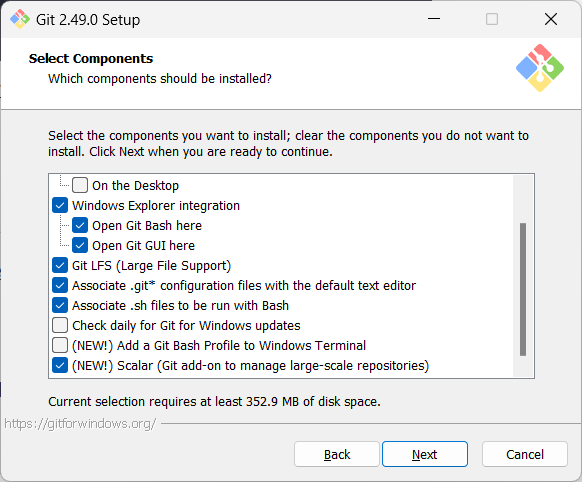
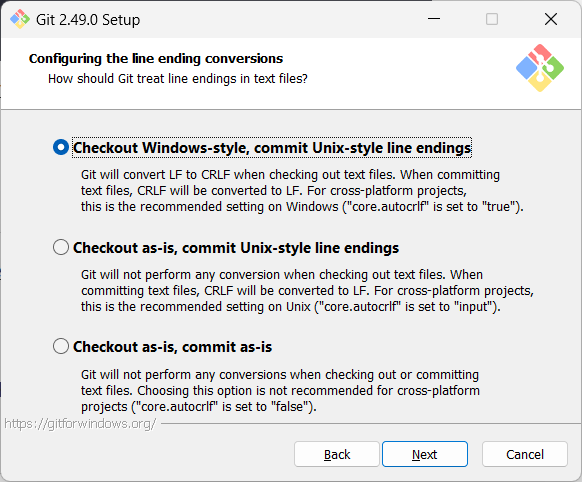
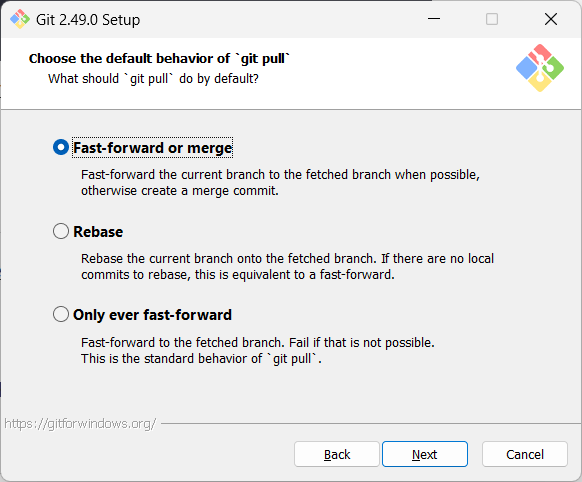
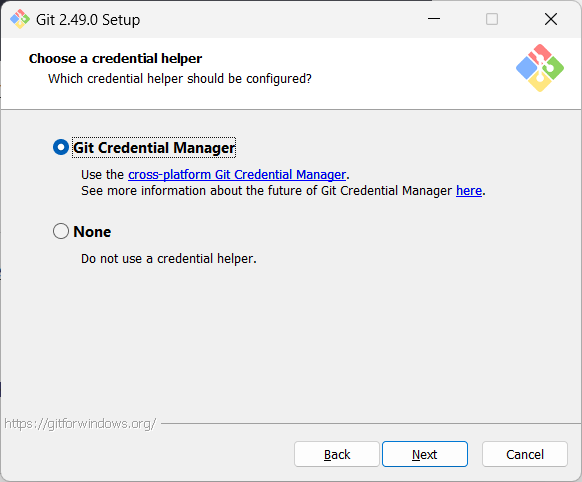
Run the installer and make sure to select the option to install Git Bash when prompted.
Screenshots given below provide some guidance on the dialogs you might encounter when installing Git. In other cases, go with the default option.

When running Git commands, we recommend Windows users to use the Git Bash terminal that comes with Git. To open Git Bash terminal, hit the key and type git-bash.
It may be possible that the installation didn't add a shortcut to the Start Menu.
You can navigate to the directory where git-bash.exe is (most likely C:\Program Files\Git\git-bash.exe), double click git-bash.exe to open Git Bash.
You can also right-click it and choose Pin to Start or Pin to taskbar.
SIDEBAR: Git Bash Terminal
Git Bash is a terminal application that lets you use Git from the command line on Windows. Since Git was originally developed for Unix-like systems (like Linux and macOS), Windows does not come with a native shell that supports all the commands and utilities commonly used with Git.

Git Bash provides a Unix-like command-line environment on Windows. It includes:
- A Bash shell (Bash stands for Bourne Again SHell), which is a widely used command-line interpreter on Linux and macOS.
- Common Unix tools and commands (like
ls,cat,ssh, etc.) that are useful when working with Git and scripting.
When copy-pasting text onto a Git Bash terminal, you will not be able to use the familiar Ctrl+V key combo to paste. Instead, right-click on the terminal and use the Paste menu option.
On Windows, you might need to close and open the terminal again for it to recognise changes done elsewhere in the computer (e.g., newly-installed software, changes to system variables, etc.).
Install homebrew if you don't already have it, and then, run brew install git
Use your Linux distribution's package manager to install Git. Examples:
Debian/Ubuntu, run
sudo apt-get updateand thensudo apt-get install git.Fedora: run
sudo dnf updateand thensudo dnf install git.
Verify Git is installed, by running the following command in a terminal.
git --version
git version 2._._
The output should display the version number.
Configuring user.name and user.email
Git needs to know who you are to record changes properly. When you save a snapshot of your work in Git, it records your name and email as the author of that change. This ensures everyone working on the project can see who made which changes. Accordingly, you should set the config settings user.name and user.email before you start Git for revision control.
Interacting with Git: CLI vs GUI
Git is fundamentally a command-line tool. You primarily interact with it through its by typing commands. This gives you full control over its features and helps you understand what’s really happening under the hood.
clients for Git also exist, such as Sourcetree, GitKraken, and the built-in Git support in editors like Intellij IDEA and VS Code. These tools provide a more visual way to perform some Git operations.
If you're new to Git, it's best to learn the CLI first. The CLI is universal, always available (even on servers), and helps you build a solid understanding of Git’s concepts. You can use GUI clients as a supplement — for example, to visualise complex history structures.
Mastering the CLI gives you confidence and flexibility, while GUI tools can serve as helpful companions.
PREPARATION: [Optional] Install a GUI client
Optionally, you can install a Git GUI client. e.g., Sourcetree (installation instructions).
Our Git lessons show how to perform Git operations in Git CLI, and in Sourcetree -- the latter just to illustrate how Git GUIs work. It is perfectly fine for you to learn the CLI only.

[image credit: https://www.sourcetreeapp.com]
Installing the Git-Mastery App
In these lessons, we are piloting a new companion app called Git-Mastery that we have been developing to help Git learners. Specifically, it provides exercises that you can do to self-test your Git knowledge, and the app will also verify if your solution is correct.
If you are new to Git, we strongly recommend that you install and use the Git-Mastery app.
To be able to save snapshots of a folder using Git, you must first put the folder under Git's control by initialising a Git repository in that folder.
Normally, we use Git to manage a revision history of a specific folder, which gives us the ability to revision-control any file in that folder and its subfolders.
To put a folder under the control of Git, we initialise a repository (short name: repo) in that folder. This way, we can initialise repos in different folders, to revision-control different clusters of files independently of each other e.g., files belonging to different projects.
You can follow the hands-on practical below to learn how to initialise a repo in a folder.
What is this? HANDS-ON panels contain hands-on activities you can do as you learn Git. If you are new to Git, we strongly recommend that you do them yourself (even if they appear straightforward), as hands-on usage will help you internalise the concepts and operations better.
Preparation Choose a folder to put under Git's control. The folder may or may not contain any files. For this practical, let us create a folder named things for this purpose.
You can get the Git-Mastery app to for doing this practical, or create the sandbox manually. Instructions for the both options are given below.
To prepare the sandbox for this practical:
- Navigate inside the
gitmastery-exercisesfolder. - Run
gitmastery download hp-init-repocommand.
The sandbox will be set up inside the gitmastery-exercises/hp-init-repo folder.
Assuming you have a folder named git-practicals that you wish to use for doing Git hands-on practicals in, you can run the following commands.
cd git-practicals
mkdir things
Avoid putting Git repos inside cloud-synced (e.g., OneDrive, Dropbox) folders. Reason: Multiple tools trying to detect/sync changes in the same folder can cause conflicts and unexpected behaviors.
If you want to access project files from multiple computers, use Git to do that (rather than cloud syncing tools).
1 Then cd into it.
cd things
2 Run the git status command to check the status of the folder.
git status
fatal: not a git repository (or any of the parent directories): .git
Don't panic. The error message is expected. It confirms that the folder currently does not have a Git repo.
3 Now, initialise a repository in that folder.
Use the command git init which should initialise the repo.
git init
Initialized empty Git repository in things/.git/
The output might also contain a hint about a name for an initial branch (e.g., hint: Using 'master' as the name for the initial branch ...). You can ignore that for now.
Note how the output mentions the repo being created in things/.git/ (not things/). More on that later.
Windows: Click
File→Clone/New…→ Click on+ Createbutton on the top menu bar.
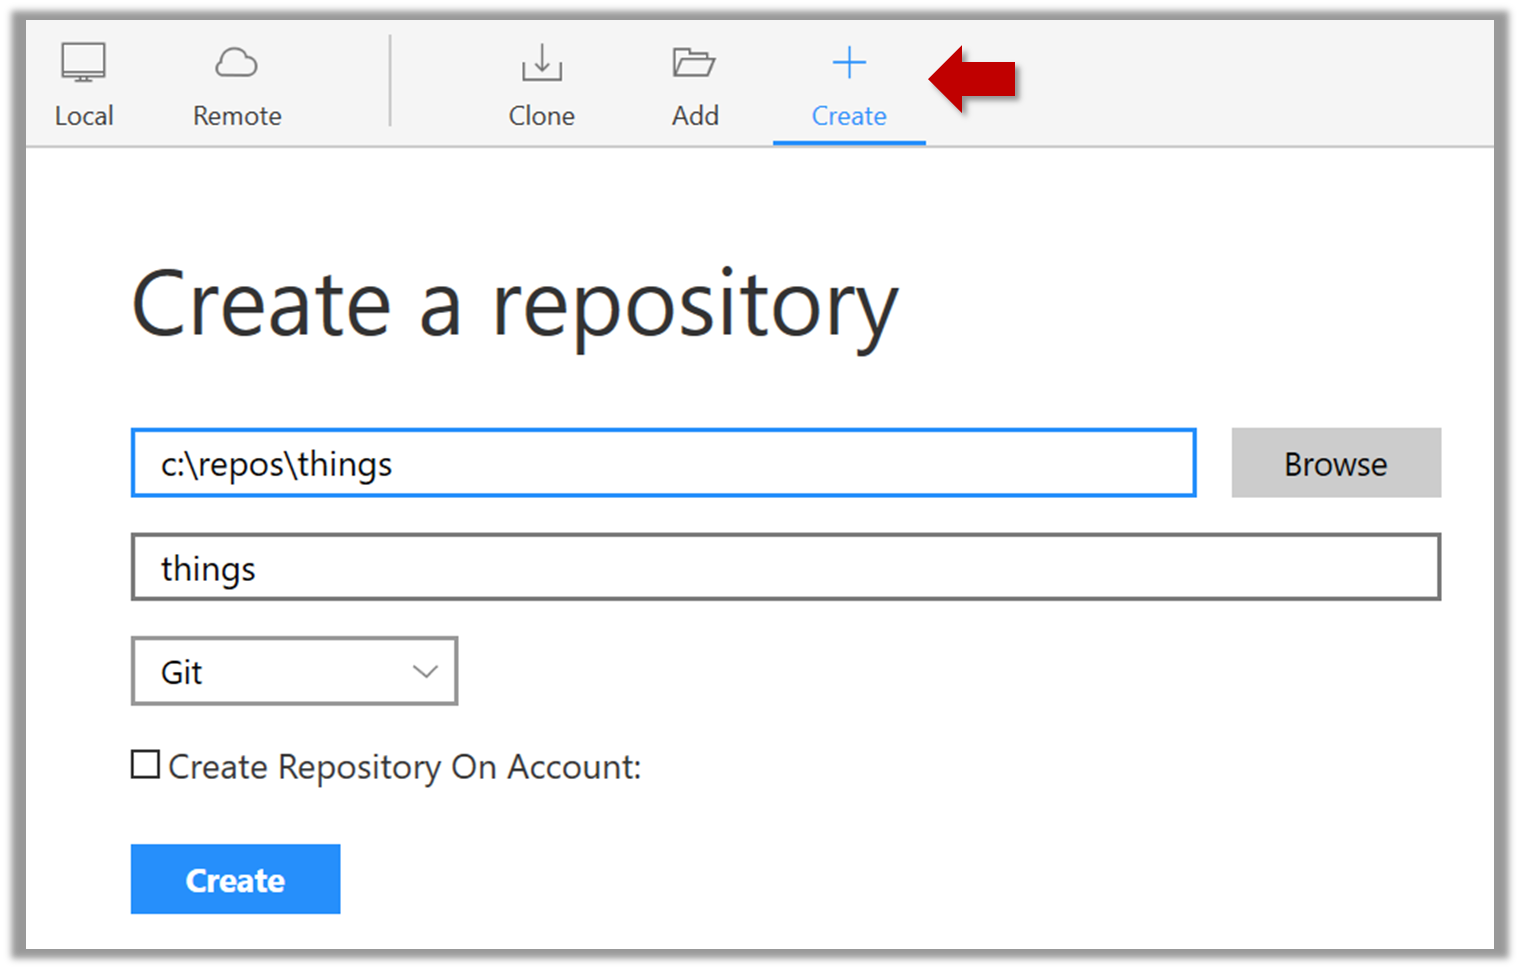
Enter the location of the directory and clickCreate.Mac:
New...→Create Local Repository(orCreate New Repository) → Click...button to select the folder location for the repository → click theCreatebutton.
done!
Initialising a repo results in two things:
- First, Git now recognises this folder as a Git repository, which means it can now help you track the version history of files inside this folder.
To confirm, you can run the git status command. It should respond with something like the following:
git status
On branch master
No commits yet
nothing to commit (create/copy files and use "git add" to track)
Don't worry if you don't understand the output (we will learn about them later); what matters is that it no longer gives an error message as it did before.
done!
- Second, Git created a hidden subfolder named
.gitinside thethingsfolder. This folder will be used by Git to store metadata about this repository.
A Git-controlled folder is divided into two main parts:
- The repository – stored in the hidden
.gitsubfolder, which contains all the metadata and history. - The working directory – everything else in that folder, where you create and edit files.
What is this? EXERCISE panels contain a Git-Mastery exercise that you can download using the Git-Mastery app, and you can use the same app to verify that your solution is correct.
What is this? DETOUR panels contain related directions you can optionally explore. We recommend that you only skim them the first time you are going through a tour (i.e., just to know what each detour covers); you can revisit them later, to deepen your knowledge further, or when you encounter a use case related to the concepts covered by the detour.
To save a snapshot, you start by specifying what to include in it, also called staging.
Git considers new files that you add to the working directory as 'untracked' i.e., Git is aware of them, but they are not yet under Git's control. The same applies to files that existed in the working folder at the time you initialised the repo.
A Git repo has an internal space called the staging area which it uses to build the next snapshot. Another name for the staging area is the index.
We can stage an untracked file to tell Git that we want its current version to be included in the next snapshot (in Git terminology, such a snapshot is called a commit). Once you stage an untracked file, it becomes 'tracked' (i.e., under Git's control). A staged file can be unstaged to indicate that we no longer want it to be included in the next snapshot.
In the example below, you can see how staging files change the status of the repo as you go from (a) to (c).
staging area
[empty]
other metadata ...
├─ fruits.txt (untracked!)
└─ colours.txt (untracked!)
(a) State of the repo, just after initialisation, and creating two files. Both are untracked.
staging area
└─ fruits.txt
other metadata ...
├─ fruits.txt (tracked)
└─ colours.txt (untracked!)
(b) State after staging
fruits.txt.staging area
├─ fruits.txt
└─ colours.txt
other metadata ...
├─ fruits.txt (tracked)
└─ colours.txt (tracked)
(c) State after staging
colours.txt.preparation
You can continue using the sandbox created in the previous hands-on practical, or,
1 Add a file (e.g., fruits.txt) to the things repo folder.
Here is an easy way to do that with a single terminal command.
echo -e "apples\nbananas\ncherries" > fruits.txt
apples
bananas
cherries
Windows users: Use the git-bash terminal to run the above command (and all commands given in these lessons). Some of them might not work in other terminals such as the PowerShell.
To see the content of the file, you can use the cat command:
cat fruits.txt
2 Stage the new file.
2.1 Check the status of the folder using the git status command.
git status
On branch master
No commits yet
Untracked files:
(use "git add <file>..." to include in what will be committed)
fruits.txt
nothing added to commit but untracked files present (use "git add" to track)
2.2 Use the git add <file> command to stage the file.
git add fruits.txt
You can replace the add with stage (e.g., git stage fruits.txt) and the result is the same (they are synonyms).
Windows users: When using the echo command to write to text files from Git Bash, you might see a warning LF will be replaced by CRLF the next time Git touches it when Git interacts with such a file. This warning is caused by the way line endings are handled differently by Git and Windows. You can simply ignore it, or suppress it in future by running the following command:
git config --global core.safecrlf false
2.3 Check the status again. You can see the file is no longer 'untracked'.
git status
On branch master
No commits yet
Changes to be committed:
(use "git rm --cached <file>..." to unstage)
new file: fruits.txt
As before, don't worry if you don't understand the content of the output (we'll unpack it in a later lesson). The point to note is that the file is no longer listed as 'untracked'.
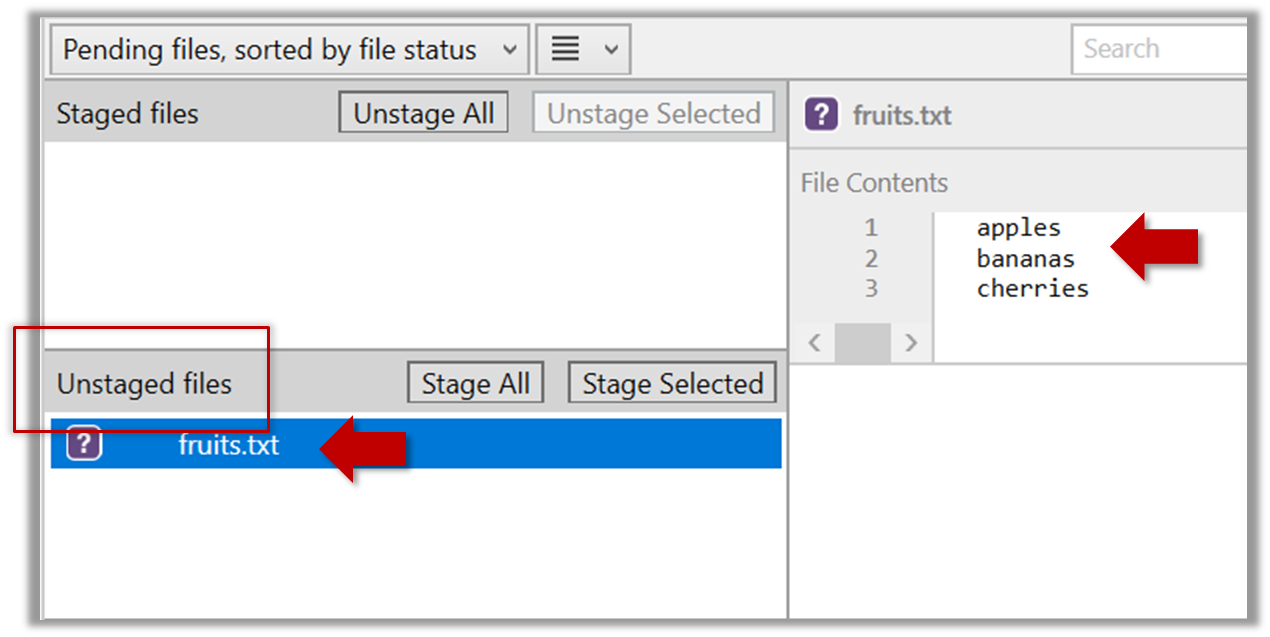
2.1 Note how the file is shown as ‘unstaged’. The question mark icon indicates the file is untracked.
If the newly-added file does not show up in Sourcetree UI, refresh the UI (: F5
| ⌥+R)
Sourcetree screenshots/instructions: vs
Note that Sourcetree UI can vary slightly between Windows and Mac versions. Some of the screenshots given in our lessons are from the Windows version while some are from the Mac version.
In som cases, we have specified how they differ.
In other cases, you may need to adapt if the given screenshots/instructions are slightly different from what you are seeing in your Sourcetree.
2.2 Stage the file:
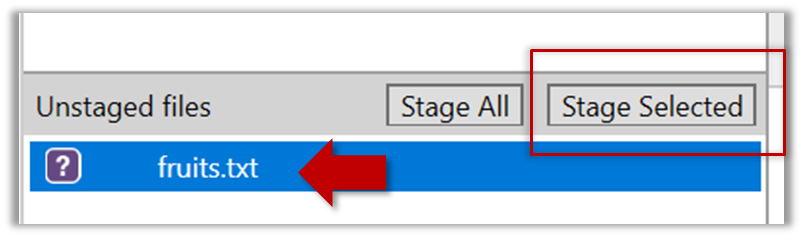
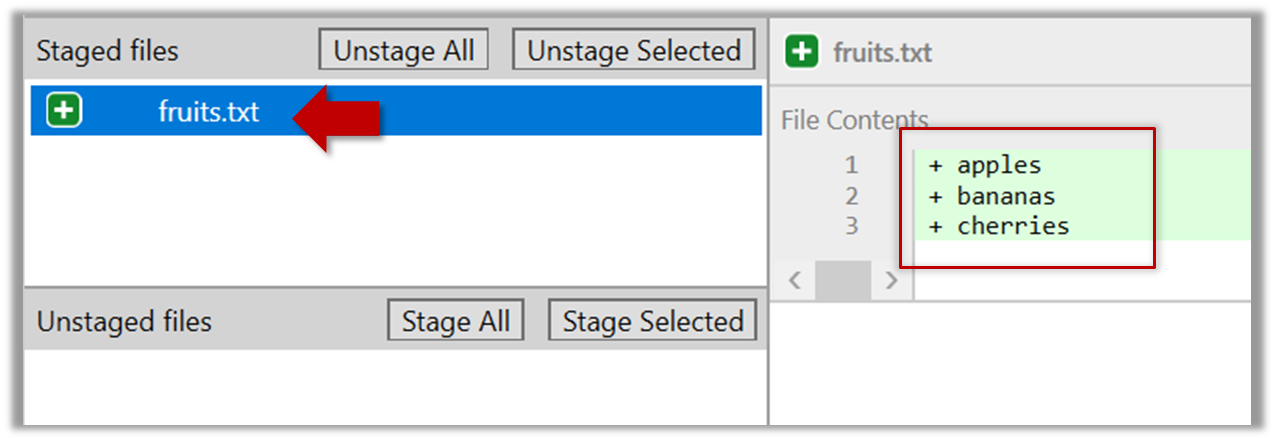
Select the fruits.txt and click on the Stage Selected button.
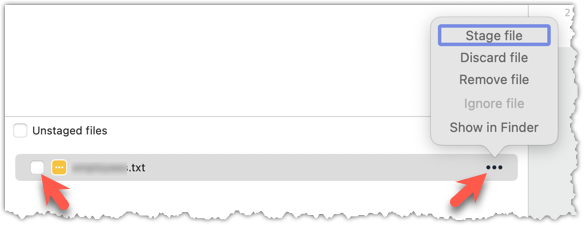
Staging can be done using tick boxes or the ... menu in front of the file.
2.3 Note how the file is staged now i.e., fruits.txt appears in the Staged files panel now.
If Sourcetree shows a \ No newline at the end of the file message below the staged lines (i.e., below the cherries line in the above screenshot), that is because you did not hit enter after entering the last line of the file (hence, Git is not sure if that line is complete). To rectify, move the cursor to the end of the last line in that file and hit enter (like you are adding a blank line below it). This new change will now appear as an 'unstaged' change. Stage it as well.
done!
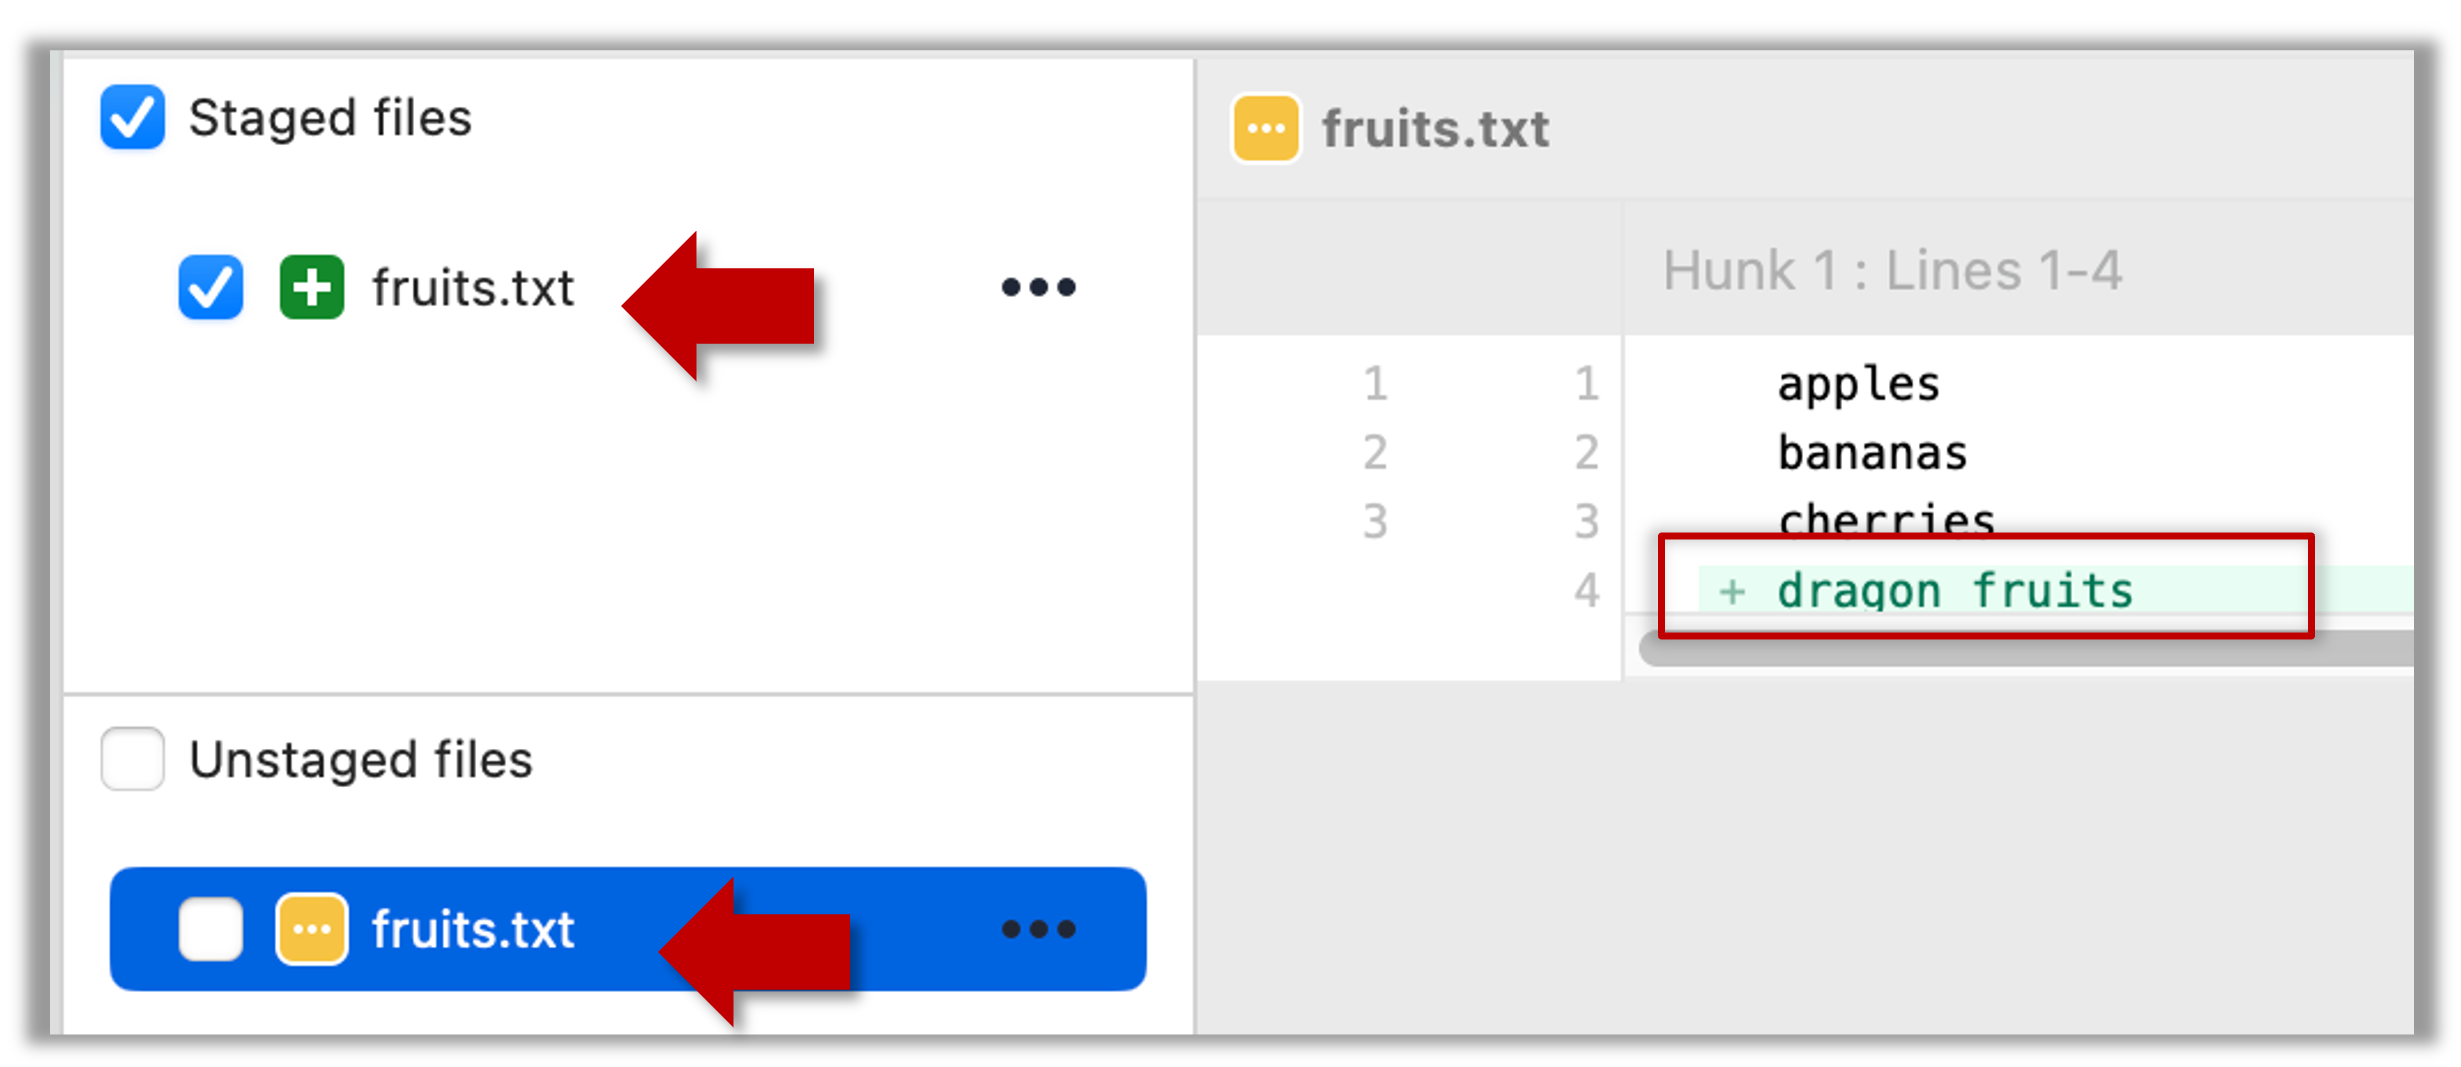
If you modify a staged file, it goes into the 'modified' state i.e., the file contains modifications that are not present in the copy that is waiting (in the staging area) to be included in the next snapshot. If you wish to include these new changes in the next snapshot, you need to stage the file again, which will overwrite the copy of the file that was previously in the staging area.
The example below shows how the status of a file changes when it is modified after it was staged.
staging area
Alice
other metadata ...
Alice
(a) The file names.txt is staged. The copy in the staging area is an exact match to the one in the working directory.
staging area
Alice
other metadata ...
Alice
Bob
(b) State after adding a line to the file. Git indicates it as 'modified' because it now differs from the version in the staged area.
staging area
Alice
Bob
other metadata ...
Alice
Bob
(c) After staging the file again, the staging area is updated with the latest copy of the file, and it is no longer marked as 'modified'.
preparation
You can continue using the sandbox created in the previous hands-on practical, or,
1 First, add another line to fruits.txt, to make it 'modified'.
Here is a way to do that with a single terminal command.
echo "dragon fruits" >> fruits.txt
apples
bananas
cherries
dragon fruits
2 Now, verify that Git sees that file as 'modified'.
Use the git status command to check the status of the working directory.
$ git status
On branch master
No commits yet
Changes to be committed:
(use "git rm --cached <file>..." to unstage)
new file: fruits.txt
Changes not staged for commit:
(use "git add <file>..." to update what will be committed)
(use "git restore <file>..." to discard changes in working directory)
modified: fruits.txt
Note how fruits.txt now appears twice, once as new file: ... (representing the version of the file we staged earlier, which had only three lines) and once as modified: ... (representing the latest version of the file which now has a fourth line).
Note how fruits.txt appears in the Staged files panel as well as 'Unstaged files'.
3 Stage the file again, the same way you added/staged it earlier.
4 Verify that Git no longer sees it as 'modified', similar to step 2.
done!
Staging applies regardless of whether a file is currently tracked.
- Staging an untracked file will both begin tracking the file and include it in the next snapshot.
- Staging an already tracked file will simply mark its current changes for inclusion in the next commit.
Git also supports fine-grained selective staging i.e., staging only specific changes within a file while leaving other changes to the same file unstaged. This will be covered in a later lesson.
Git does not track empty folders. It tracks only folders that contain tracked files.
You can test this by adding an empty subfolder inside the things folder (e.g., things/more-things) and checking if it shows up as 'untracked' (it will not). If you add a file to that folder (e.g., things/more-things/food.txt) and then staged that file (e.g., git add more-things/food.txt), the folder will now be included in the next snapshot.
PRO-TIP: Applying a Git command to multiple files in one go
When a Git command expects a list of files or paths as a parameter (as the git add command does), these parameters are known as pathspecs — patterns that tell Git which files or directories to operate on. Pathspecs can be simple file names, directory names, or more complex patterns.
Here are some common ways to write them, shown with examples using the git add <pathspec> command:
Specify multiple files, separated by spaces:
git add f1.txt f2.txt data/lists/f3.txt # stages the specified three filesUse a glob pattern:
git add '*.txt' # stages all .txt files in the current directoryQuoting the glob pattern is recommended so your shell doesn’t expand it before Git sees it.
Use
.to indicate 'all in the current directory and subdirectories':git add . # stages all files in current directory and its subdirectoriesSpecific directory, to indicate 'this directory and its subdirectories':
git add path/to/dir # stages all files in path/to/dir and its subdirectoriesNegated pathspecs, to indicate 'except these':
git add . ':!*.log' # stage everything except .log files
Git supports combining these features — for example, you could add all .txt files except those in a certain folder using:
git add '*.txt' ':!docs/*.txt'
DETOUR: Unstaging Changes
You can unstage a staged file, which simply removes it from the staging area but keeps the changes in your working directory. This is useful if you later realise that you don’t actually want to include a staged file in the next commit — perhaps you staged it by mistake, or you want to include that change in a later commit.
To unstage a file you added or modified, run
git restore --staged <pathspec>. This command removes the file from the staging area, leaving your working directory untouched.git restore --staged plan.txt budget.txt data/list.txtIf your repo does not have any commits yet,
git restore --stagedwill fail with the error fatal: could not resolve HEAD.
The remedy is to usegit reset <pathspec>instead.git reset plan.txtIn fact,
git resetis an alternative way of unstaging files, and it works regardless of whether you have any commits.Wait. Then why does
git restore --stagedexists at all, given it is more verbose and doesn't even work in some special cases?
Answer: It is still considered the "modern" way of unstaging files (it was introduced more recently), because it is more intuitive and purpose-specific -- whereas thegit resetserves multiple purposes and, if used incorrectly, can cause unintended consequences.The
restorecommand can accept multiple files/paths as input, which means you can use the notation for specifying multiple files. For example, to unstage all changes you've staged, you can use thegit restore --staged .To unstage a file deletion (staged using
git rm), use the same command as above. It will unstage the deletion and restore the file in the staging area.
If you also deleted the file from your working directory, you may need to recover it separately withgit restore <file-name(s)>git restore data/list.txt data/plan.txtTo 'nuke' all changes (i.e., get rid of all staged and unstaged changes to tracked files), you can add the
--worktreeflag to thegit restore --staged <pathspec>command.git restore --staged --worktree . # nuke all changes in current folder and subfolders
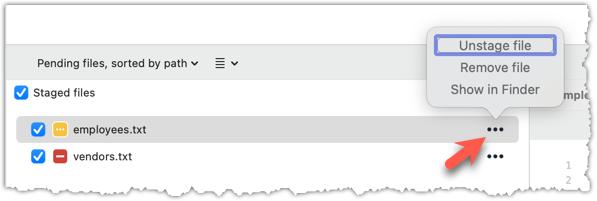
To unstage a file, locate the file among the staged files section, click the ... in front the file, and choose Unstage file:
After staging, you can now proceed to save the snapshot, aka creating a commit.
Saving a snapshot is called committing and a saved snapshot is called a commit.
A Git commit is a full snapshot of your working directory based on the files you have staged, more precisely, a record of the exact state of all files in the staging area (index) at that moment -- even the files that have not changed since the last commit. This is in contrast to other revision control software that only store the in a commit. Consequently, a Git commit has all the information it needs to recreate the snapshot of the working directory at the time the commit was created.
A commit also includes metadata such as the author, date, and an optional commit message describing the change.
A Git commit is a snapshot of all tracked files, not simply a delta of what changed since the last commit.
Assuming you have previously staged changes to the fruits.txt, go ahead and create a commit.
1 First, let us do a sanity check using the git status command.
git status
On branch master
No commits yet
Changes to be committed:
(use "git rm --cached <file>..." to unstage)
new file: fruits.txt
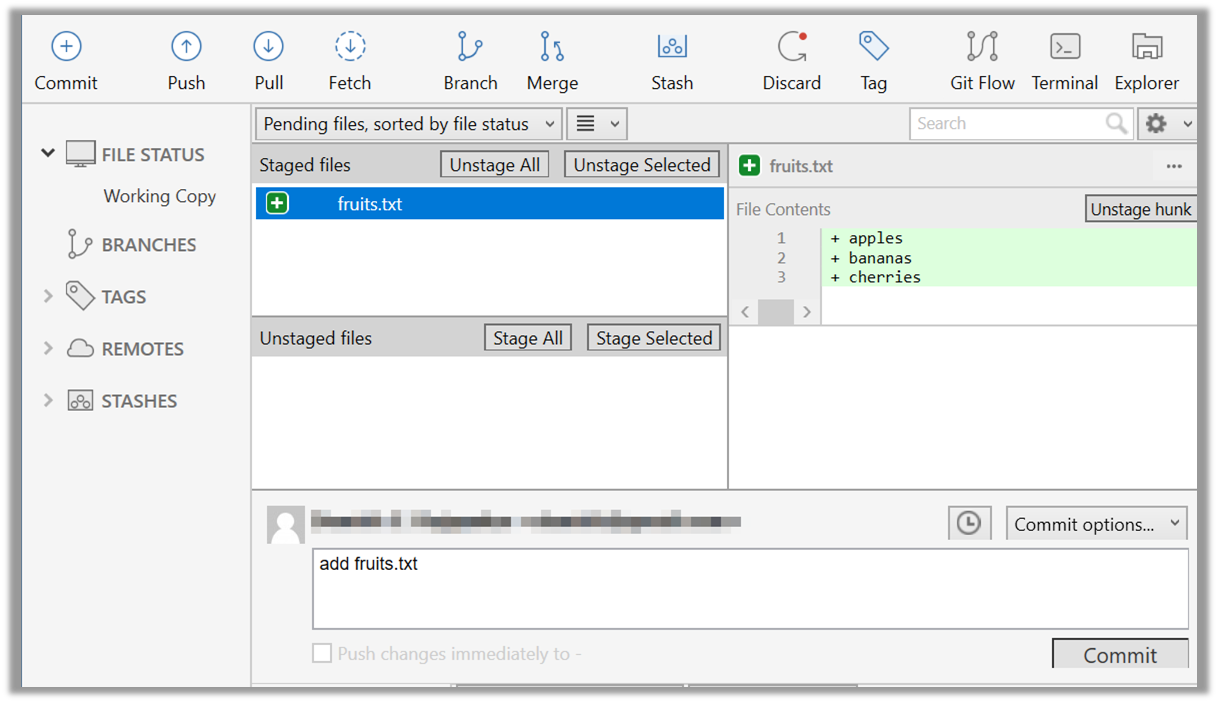
2 Now, create a commit using the commit command. The -m switch is used to specify the commit message.
git commit -m "Add fruits.txt"
[master (root-commit) d5f91de] Add fruits.txt
1 file changed, 5 insertions(+)
create mode 100644 fruits.txt
3 Verify the staging area is empty using the git status command again.
git status
On branch master
nothing to commit, working tree clean
Note how the output says nothing to commit which means the staging area is now empty.
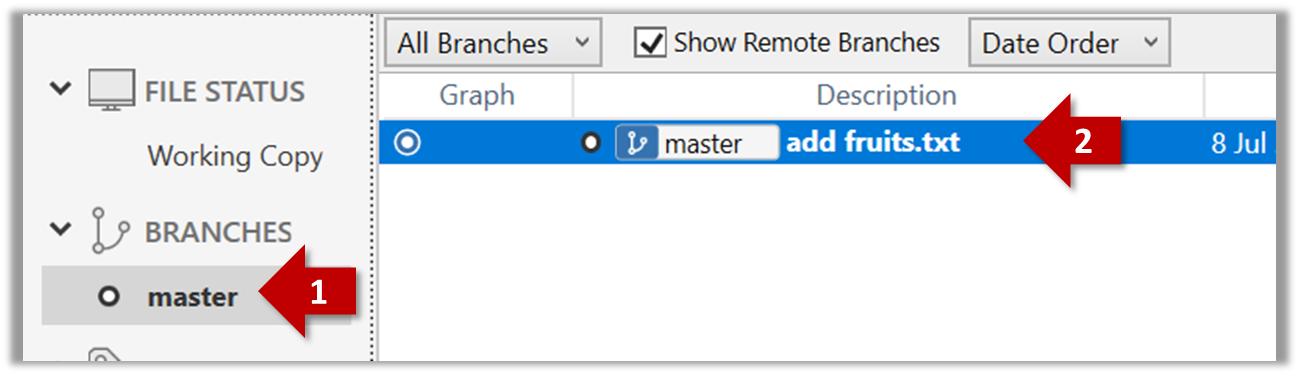
Click the Commit button, enter a commit message (e.g. add fruits.txt) into the text box, and click Commit.
done!
It is useful to be able to visualise the commits timeline, aka the revision graph.
Git commits form a timeline, as each corresponds to a point in time when you asked Git to take a snapshot of your working directory. Each commit links to at least one previous commit, forming a structure that we can traverse.
A timeline of commits is called a branch. By default, Git names the initial branch master -- though many now use main instead. You'll learn more about branches in future lessons. For now, just be aware that the commits you create in a new repo will be on a branch called master (or main) by default.
gitGraph
    %%{init: { 'theme': 'default', 'gitGraph': {'mainBranchName': 'master (or main)'}} }%%
    commit id: "Add fruits.txt"
    commit id: "Update fruits.txt"
    commit id: "Add colours.txt"
    commit id: "..."
Git can show you the list of commits in the Git history.
Preparation Use the things repo you created in a previous lesson. Alternatively, you can use the commands given below to create such a repo from scratch.
mkdir things # create a folder for the repo
cd things
git init
echo -e "apples\nbananas\ncherries\ndragon fruits" > fruits.txt
git add fruits.txt
git commit -m "Add fruits.txt"
You can copy-paste a list of commands (such as commands given above), including any comments, to the terminal. After that, hit enter to run them in sequence.
1 View the list of commits, which should show just the one commit you created just now.
You can use the git log command to see the commit history.
git log
commit ... (HEAD -> master)
Author: ... <...@...>
Date: ...
Add fruits.txt
Use the Q key to exit the output screen of the git log command.
Note how the output has some details about the commit you just created. You can ignore most of it for now, but notice it also shows the commit message you provided.
Expand the BRANCHES menu and click on the master to view the history graph, which contains only one node at the moment, representing the commit you just added. For now, ignore the label master attached to the commit.
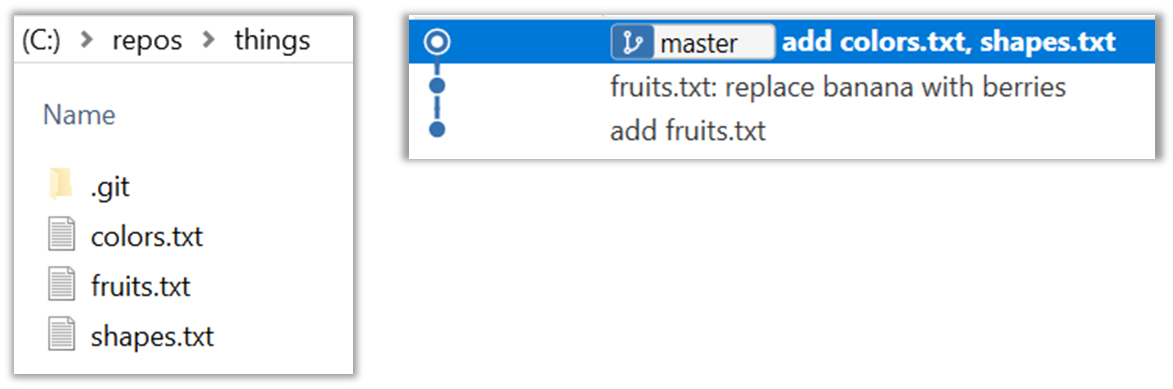
2 Create a few more commits (i.e., a few rounds of add/edit files → stage → commit), and observe how the list of commits grows.
Here is an example list of bash commands to add two commits while observing the list of commits
echo "figs" >> fruits.txt # add another line to fruits.txt
git add fruits.txt # stage the updated file
git commit -m "Insert figs into fruits.txt" # commit the changes
git log # check commits list
echo "a file for colours" >> colours.txt # add a colours.txt file
echo "a file for shapes" >> shapes.txt # add a shapes.txt file
git add colours.txt shapes.txt # stage both files in one go
git commit -m "Add colours.txt, shapes.txt" # commit the changes
git log # check commits list
The output of the final git log should be something like this:
commit ... (HEAD -> master)
Author: ... <...@...>
Date: ...
Add colours.txt, shapes.txt
commit ...
Author: ... <...@...>
Date: ...
Insert figs into fruits.txt
commit ...
Author: ... <...@...>
Date: ...
Add fruits.txt
SIDEBAR: Working with the 'less' pager
Some Git commands — such as git log— may show their output through a pager. A pager is a program that lets you view long text one screen at a time, so you don’t miss anything that scrolls off the top. For example, the output of git log command will temporarily hide the current content of the terminal, and enter the pager view that shows output one screen at a time. When you exit the pager, the git log output will disappear from view, and the previous content of the terminal will reappear.
command 1
output 1
git log
→
commit f761ea63738a...
Author: ... <...@...>
Date: Sat ...
Add colours.txt
By default, Git uses a pager called less. Given below are some useful commands you can use inside the less pager.
| Command | Description |
|---|---|
q | Quit less and return to the terminal |
↓ or j | Move down one line |
↑ or k | Move up one line |
Space | Move down one screen |
b | Move up one screen |
G | Go to the end of the content |
g | Go to the beginning of the content |
/pattern | Search forward for pattern (e.g., /fix) |
n | Repeat the last search (forward) |
N | Repeat the last search (backward) |
h | Show help screen with all less commands |
If you’d rather see the output directly, without using a pager, you can add the --no-pager flag to the command e.g.,
git --no-pager log
It is possible to ask Git to not use less at all, use a different pager, or fine-tune how less is used. For example, you can reduce Git's use of the pager (recommended), using the following command:
git config --global core.pager "less -FRX"
Explanation:
-F: Quit if the output fits on one screen (don’t show pager unnecessarily)-R: Show raw control characters (for coloured Git output)-X: Keep content visible after quitting the pager (so output stays on the terminal)
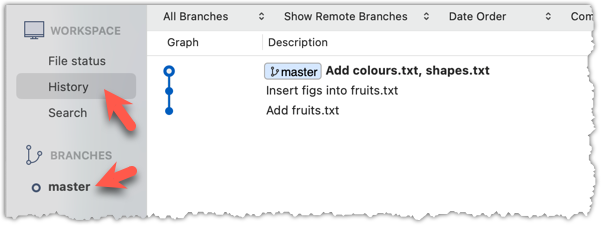
To see the list of commits, click on the History item (listed under the WORKSPACE section) on the menu on the right edge of Sourcetree.

After adding two more commits, the list of commits should look something like this:
done!
The Git data model consists of two types of entities: objects and refs (short for references). In this lesson, you will encounter examples of both.
A Git revision graph is a visualisation of a repo's revision history, consisting of one or more branches. First, let us learn to work with simpler revision graphs consisting of one branch, such as the one given below.
- Nodes in the revision graph represent commits. A commit is one of four main types of Git objects. For completeness, the other three are:
- blob (short for binary large object): stores the contents of a file
- tree: represents a directory and records the hierarchy of its contents by referencing blobs and other trees
- tag (specifically, annotated tag): a label-like object that can store additional metadata and point to a specific commit
- A commit is identified by its SHA value. A SHA (Secure Hash Algorithm) value is a unique identifier generated by Git to represent each commit. It is produced by using SHA-1 (i.e., one of the algorithms in the SHA family of cryptographic hash functions) on the entire content of the commit. It's a 40-character hexadecimal string (e.g.,
f761ea63738a67258628e9e54095b88ea67d95e2) that acts like a fingerprint, ensuring that every commit can be referenced unambiguously. That is, every commit has a unique SHA-1 hash value. - A commit is a full snapshot of the working directory, constructed based on the previous commit, and the changes staged. That means each commit (except the initial commit) is based on a another 'parent' commit. Some commits can have multiple parent commits -- we’ll cover that later.
Given every commit has a unique hash, the commit hash values you see in our examples will be different from the hash values of your own commits, for example, when following our hands-on practicals.
Edges in the revision graph represent links between a commit and its parent commit(s). In some revision graph visualisations, you might see arrows (instead of lines) showing how each commit points to its parent commit.
Git uses refs to name and keep track of various points in a repository’s history. These refs are essentially 'named-pointers' that can serve as bookmarks to reach a certain point in the revision graph using the ref name.
In the revision graph above, there are two refs master and ←HEAD.
- master is a branch ref. A branch ref points to the latest commit on a branch. In this visualisation, the commit shown alongside the ref is the one it points to i.e.,
C3.
When you create a new commit, the branch ref of the branch moves to the new commit. - ←HEAD is a special ref that typically points to the current branch and moves along with that branch ref. In this example, it is pointing to the
masterbranch.
In certain cases, theHEADmay point directly to a specific commit instead of a branch. This situation is called a "detachedHEAD", which will be covered in a later lesson.
Target Use Git features to examine the revision graph of a simple repo.
Preparation Use a repo with just a few commits and only one branch.
1 First, use a simple git log to view the list of commits.
git log
commit f761ea63738a... (HEAD -> master)
Author: ... <...@...>
Date: Sat ...
Add colours.txt, shapes.txt
commit 2bedace69990...
Author: ... <...@...>
Date: Sat ...
Add figs to fruits.txt
commit d5f91de5f0b5...
Author: ... <...@...>
Date: Fri ...
Add fruits.txt
Given below the visual representation of the same revision graph. As you can see, the log output shows the refs slightly differently, but it is not hard to see what they mean.
2 Use the --oneline flag to get a more concise view. Note how the commit SHA has been truncated to first seven characters (first seven characters of a commit SHA is enough for Git to identify a commit).
git log --oneline
f761ea6 (HEAD -> master, origin/master) Add colours.txt, shapes.txt
2bedace Add figs to fruits.txt
d5f91de Add fruits.txt
3 The --graph flag makes the result closer to a graphical revision graph. Note the * that indicates a node in a revision graph.
git log --oneline --graph
* f761ea6 (HEAD -> master, origin/master) Add colours.txt, shapes.txt
* 2bedace Add figs to fruits.txt
* d5f91de Add fruits.txt
The --graph option is more useful when examining a more complicated revision graph consisting of multiple parallel branches.
Click the History to see the revision graph.
- In some versions of Sourcetree, the
HEADref may not be shown -- it is implied that theHEADref is pointing to the same commit the currently active branch ref is pointing.
done!
At this point: You should now be able to initialise a Git repository in a folder and commit snapshots of its files at times of your choice. So far, you did not learn how to actually make use of those snapshots (other than to show a list of them) -- we will do that in later tours.
What's next: Tour 2: Backing up a Repo on the Cloud